.widget.Profile .widget-content>a img.profile-img { min-width: 80px!important; min-height: 80px!important; max-width: 80px; border-radius: 40px; } .widget.Profile .widget-content>a img.profile-img { float: center; } .widget.Profile { text-align: center; float: center; margin: auto; }


31 October 2013

Pumpkin Spice, Chocolate Chip Pudding Cookies


Happy Halloween! Ninja is wearing his army snuggie, yes snuggie, becuase that is how he rolls. My class dressed up for their exam today because it was Halloween (and I offered them extra credit if they did -- gotta have fun ;). And today marks the end of my Spooktacular countdown. And is the reason (well, one of the reasons) I did not post yesterday.  I did not forget. I wanted to make this yummy treat for the hubby's work Halloween party and I just hate making over a day old baked goods for a party. And of course, what fun would it be if I did not post a treat on Halloween. Besides, who made up the rules that countdowns had to be everday ;) I believe in breaking a few rules, being a bit of a hippie, going outside the box, eating that extra cookie or that whole bar of chocolate, and acting like a big kid!

Well, if you know me but at all -- you would know that I would not do any countdown without including a pudding cookie recipe. Remember, I am hardcore addicted to pudding cookies. And I pretty much have not made a non-pudding cookie since. There is just no other way to make a cookie. Why would anyone not want a cookie that is always moist, delicious an delectable. That would just never happen. When I went to the grocery store to pick up ingredients and decor for my Spooktacular countdown, I saw this pumpkin spice pudding. And pudding cookie just popped into my head. Just a heads up, apparently this flavor of pudding is generally only sold at Wal-mart. 

Plus, the hubby LOVES himself pumpkin desserts. He fills up on all things pumpkin. Not only did I want to make these pudding cookies for the hubby's party because I have never had a pudding cookie not be a big hit but I thought it was a great transition. Pumpkin is so Halloweeny (hahaha..it's a word) but it is also Fally (also a word) -- the perfect food to go from Halloween to Thanksgiving! These cookies are AMAZING -- with just the right subtle hint of pumpkin spice. The hubby convinced me that he just had to "try" one before taking it to work, just to "ensure" they tasted good. I also took some to school with me. They were gone instantly. So say goodbye to Halloween and hello to Thanksgiving season in an awesome way! :)


PUMPKIN SPICE, CHOCOLATE CHIP PUDDING COOKIES
Adapted from Chef-in-Training

INGREDIENTS


Preheat over to 350F Degrees

2 1/2 c. all purpose flour*
2 tsp. baking soda
1 (3.4-3.56 oz) box of pumpkin spice pudding (dry)
1 1/2 stick of butter, softened
1/2 c. granulated sugar
1 c. brown sugar
2 large eggs, room temperature
2 tsp. vanilla extract
1 tbsp. honey
1 1/2 c. of chocolate chunks

*If dough is sticky add an extra 1/4 c. of flour

DIRECTIONS

In a medium bowl, whisk together flour, baking soda, and pumpkin spice pudding mix- set aside. In the bowl of a stand mixer, fitted with paddle attachment, cream together (on medium speed) butter and both sugars until fluffy (about 5 minutes). Then add eggs, one at time, followed by vanilla and honey. Scrape down sides. Then reduce to low speed and add dry ingredients. Combine until just incorporated. Finally fold in chocolate chips .

Line baking sheet with baking mat, aluminum foil, parchment or wax paper. Scoop out 1 1/2-2 inch, cookie dough balls onto sheet (roll between the palm of your hands for a nice round shape). Space the cookies 2 inches apart. Slightly flatten the cookies using the palm of your hand. Bake for 8-10 minutes. Let cool for 5 minutes before transferring to cooling rack.

Enjoy,
Chika

29 October 2013

Candy Corn, Creamy Chocolate Fudge


I am exhausted. Ever have one of those days, where you weren't gone all day, but in just a short time -- you just feel all the energy just left you? I am having one of those days. I am grateful for a wonderful, hubby, because I hinted that I was craving some sushi and so we had an impromptu date night :) A much needed date night. Sushi -- time with the hubby -- was a perfect way to relax after a tiring day. I just ordered a bunch of sushi just to enjoy little bites of everything I love (but hey, gotta love left overs). I ordered a New York Roll, a Louisiana Roll (I like states rolls apparently ;), as well as my classics, Spicy Tuna and Shrimp Tempura. Yum!


We went to one of my favorite places -- 40 Tempura (where I usually ask to go on my birthday) but this time, I was quite disappointed. I am definitely a customer who is willing to give a bad tip if the service was horrible and a large tip if I loved the service. I try to be patient and understanding, but something's just get to me. The waitress we got today, would not refill our water, when I asked for spicy mayo would give me a squirt -- like what the hey -- and when she offered to put my extra sushi to go (which I would have happily done myself)-- she just dumped all the sushi on top of one another and smushed it together -- so some of the sushi just fell apart! Ugh! Do NOT mess with my sushi ;) She was clearly messing with me on the wrong day -- so not only did I tip her not very well BUT I also left a note on my receipt about how I did not enjoy her service and how she disappointed me in a place I usually love to go! Bummer...


Let's end on a good note, shall we? And what better way to end then chocolate FUDGE! I LOVE fudge. One of my favorite recipes is my Soft Dark Chocolate M&M Fudge (deeee-licous). But that has been my only fudge recipe. And so I have been looking for another opportunity to make fudge ever since. And what better opportunity than my Spooktacular countdown! Plus, it was a great and easy to way to incorporate candy corn again. I always used to think fudge was hard to make. I mean something that awesome cannot be that easy, right? But it is one of the easiest things to make! Like E-A-S-Y! And always so yummy. I have been eating fudge ever since this morning!


CANDY CORN, CREAMY CHOCOLATE FUDGE
Adapted from All Recipes

INGREDIENTS

2/3 c. evaporated milk
1 1/2 c. sugar
pinch of salt
1/4 c. (1/2 stick) of butter 
1 (7 oz.) jar of marshmallow creme
3 c. chocolate chips
1 tsp. vanilla
1/2-1 c. of candy corn

DIRECTIONS

Line a 8x8 baking dish with aluminum foil. Grease aluminum foil with butter, shortening or cooking spray. This will help when removing fudge from baking dish, and easier, cleaner cutting into squares.

In a large saucepan over medium heat whisk together evaporated milk, sugar, salt and butter.  Once combined, add in marshmallow creme. Marshmallow creme will dissolve with continued stirring. Bring contents to a boil, all the while constantly stirring. Do not stop stirring as it will burn. Once boiling, cook for an additional 5 minutes.

Remove from heat and stir in chocolate chips, one cup at a time, until completely melted and mixture is smooth. Then stir in vanilla. Pour into prepared baking dish. Let sit for about 5 minutes, to slightly harden. Sprinkle candy corn over the top of the fudge and gently push in candy corn to set. Refrigerate for approximately 2 hours or until firm.

Enjoy,
Chika

28 October 2013

Halloweenie Mummies


Before I talk food -- I wanted to talk TV :) I am officially a huge Voice addict. I usually like to keep it extra classy and watch shows like the Real Housewives (all....of...them). Hahaha...yes....let's not judge me :) But I happened to accidentally catch one of the episodes of the blind auditions and have been hooked ever since. I am a sucker for good music. Music is very cathartic for me. When I am stressed, baking, cooking, walking...you will find me listening to music. I love a good singer, especially when they give you goosebumps with their voice (you know...Brian McKnight...Boyz II Men). I am currently watching the knockout rounds as I type :) I'm in love, plus I may have a mini crush on Adam Levine. A little eye candy (don't tell the hubby...) and good music on a Monday night, not a bad way to wrap up the day and prepare for a long night writing an exam :/ 

Now onto the meat of the post (hahaha...get it...meat...hot dog...yes corny jokes are awesome). I decided to give the hubby a little break and include a savory treat in my Spooktacular countdown to Halloween. And this will be the only savory recipe in this countdown. Of course it had to include hot dogs. My childhood obsession with hotdogs has to come out on my big kid holiday! And so I though I would get the hubby in the big-kid-halloween spirit by making him these Halloweenie mummies. And how awesome is the name...HalloWEENIE mummies! Too stinkin' cute. Every part of this recipe was fun. I was cracking up the entire time, probably because I was making it for my 28-year-old hubby ;)

They were absolutely adorable! This is definitely something I feel every mom, dad, big sister, big brother or older cousin should make for a little one before (or after) they go out trick-or-treating to end their Halloween night, perfectly. I don't have a little one and so that is why I decided to make it for my "big baby." hahahah. What I loved most about this, is that most Halloween hot dog mummy recipes are boring-- they simply wrap the hot dog. How is that even a mummy?!?! It's not....its a cocoon. But this recipe allows the mummies to have arms and legs. So they actually look like mummies. You have got to make this. And even if you do not have kids, just make them for you "big baby" or let your big kid come out and eat hot dogs!!! Not only are they cute but delicious too! Yum!


HALLOWEENIE MUMMIES 
Adapted from Our Ordinary Life 

INGREDIENTS 

Preheat Oven to 350F
 
8 hot dogs*
8 oz. crescent rolls
Ketchup and/or mustard for dipping 

The larger the hot dog the better (like Ballpark Franks). I do not eat beef and so my choices for hot dogs were limited. Apparently turkey hot dogs, don't come big ;)

 DIRECTIONS

Line a large baking sheet with a baking mat, aluminum foil or parchment paper. Set aside.

Then dab hot dogs with a paper towel to remove any moisture. Cut the bottom center of the hot dogs to create legs and the sides to create arms. Set aside.

Open and roll out the crescent rolls. Cut each triangle lengthwise into thin strips. The strips from one triangle is the perfect amount to wrap one hot dog (but remember I got regular sized hot dogs). Once triangles are cut into thin strips, wrap around hot dog to create "mummy effect."

Lay Halloweenie mummies on baking sheet and coat with a light layer of cooking spray. Bake 15-20 minutes, until crescent dough is golden brown. Allow to cool slightly and serve with ketchup and/or mustard.

That's it! Enjoy,
Chika

27 October 2013

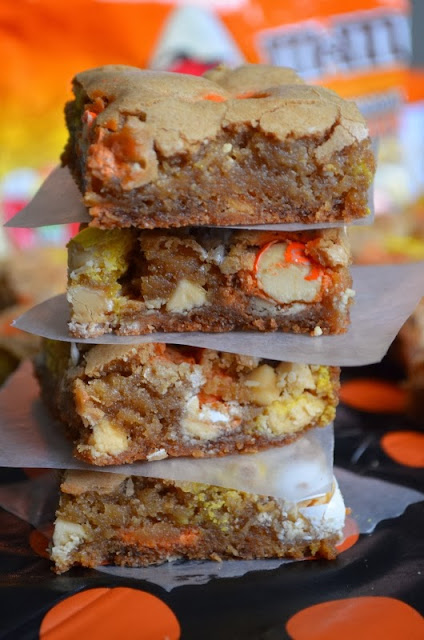
Candy Corn M&M Cookie Bars


Remember in elementary school when it was Halloween, and you got to bring your costume to school? And then towards the end of the day, you got to stop schoolwork early, change into your costume and enjoy treats that all the parents sent with their kids to school?! I loved it! It was so fun. I was a red devil, a witch, Frankenstein. Looking back, I loved how my parents never forced me to be anything girly -- I got to be whatever I wanted to be :) I hope that when I have kids, I'll push them to think outside of the box for their costumes and not just be a "princess" or "superhero" but maybe a "princess superhero" :) Well, its clear from Facebook that the Halloween celebrations have begun! I love seeing all the costumes, especially the creative ones!

Hopefully either you, your significant other, child or all of the above have  a Halloween party coming up for which you plan to make some treats for. For that I bring you Day 4 of my Spooktacular countdown to Halloween. Candy corn epitomizes Halloween treats -- I know, I know, Halloween is associated with treats in general, but if you could think of one sweet that is Halloween and only available around Halloween -- it is candy corn! Well, last year, the hubby found these candy corn M&Ms and decided to try it. I knew I wanted to incorporate candy corn into my Spooktacular countdown. I thought of these M&Ms from last year, and decided they would be a creative twist to a candy corn dessert.

I really enjoy cookie bars, because you get the fun of a cookie but the ease of a bar. Because you just get to dump the batter in a baking dish and let it bake :) Super duper easy, right?! They came out perfect! They smelled so wonderful coming out of the oven -- the mix of white chocolate and candy corn M&Ms in a cookie batter...mmmm....just how a home should smell during Halloween. I gave some to Justin and Luke, and Ashley is going to swing by in a bit to get the rest. The hubby is having a hard time keeping up with eating all the sweets since I am making a new one each day. Hahahaha...he could use all the help he can get ;)


CANDY CORN M&M COOKIE BARS 
Cookie bar adapted from Bakestravaganza

INGREDIENTS

2 1/8 c. flour
1 tsp. baking soda
1 1/2 sticks of butter, softened
1 c. packed brown sugar
1/2 c. sugar
1 egg + 1 egg yolk
2 tsp. vanilla
1 c. white chocolate chips
9.9 oz. candy corn M&Ms, divided

DIRECTIONS

In a small bowl, sift and then whisk together flour and baking soda. Set aside. Then in the bowl of a stand mixer fitted with paddle attachment cream together butter and sugars, approximately 5 minutes, until light and fluffy. Add egg and egg yolk, followed by vanilla -- mixing until well combined. Stir in dry ingredients until just incorporated. Do not over mix. Remove from mixer and, using a spatula, fold in white chocolate chips and half of the M&Ms.

Line a 9x13 or 9x15 baking dish with aluminum foil. Grease aluminum foil with butter, shortening or cooking spray. This will help when removing bars from baking dish, allow for cooling, and easier, cleaner cutting into squares.

Spread batter evenly in baking dish. Sprinkle the remaining M&Ms evenly onto the top of the batter and gently press in. Bake 30-35 minutes or until inserted toothpick comes out clean. Allow to completely cool before cutting into squares.

Enjoy,
Chika

Dirt Cupcakes filled w/ Chocolate Mousse


You know that cliched saying, "old married couple." Well I understand it now :) See, even just being married a year and half, I feel that phrase describes me and the hubby perfectly. I love spending weekends at home with the hubby and Ninja. I can't even tell you how long it's been since I've been "out." But I have to say that I interpret the phrase differently -- old married couple implies boring -- but they way I see it is, most people go out to be single and mingle. Old married couples are people who are happy with each other and find so much content just being at home, spending time with each other. And that describes the hubby and I so much better :) Well this weekend, I broke my mold and went out to karaoke for a birthday.

My labmates (aka: my cupcake buddies)

Grad school would not be possible without her :)
Then yesterday our program hosted our annual Halloween party, though we skipped the last two years. My first year here, I made these Dirt-worm cupcakes (but no filling). It was like a full circle, now being in my fourth year and making them again :) When I saw this recipe on Pinterest but with a chocolate mousse filling, I knew I had to make it. I absolutely love filled cupcakes. I mean, it's like a surprise when you bite in. It was a hit at the party because two other people made cupcakes and mine were all gone...yay! You know that dreadful feeling where you made something that someone else also made for a potluck -- I always get nervous that my food will be compared in this informal competition. And I hate competitions!

The hubby loved the filling so much, that he is eating the left over mousse that I did not use for the cupcakes, as I type! It's so yummy, that you are going to find yourself "accidentally" having your finger fall into it and then having the heavy job of eating it...darn... ;) This is a great cupcake to make for a class party for your kid or just to make with your kid, because they are so fun to make. The whole point is to get "dirty" (aka: chocolatey...which is awesome).

Sorry that this post is a little late. Do not worry, I did not forget about Day 3 of my Spooktacular countdown to Halloween. That would just be tragic. With the Halloween party last night, I ran out of time to post. I made these cupcakes, packed them up and ran off to the party (which was a blast). Which just means that today will have two posts to make up for yesterday!


DIRT WORM CUPCAKES FILLED W/ CHOCOLATE MOUSSE
Adapted from Inside a BruCrew Life
INGREDIENTS

Preheat Oven 325F Degrees

FOR THE CUPCAKES
1 box of chocolate cake mix (I used Duncan Hines)
3 eggs, room temperature
1 c. milk (can substitute with water)
1 stick of butter melted (1/2 c.)

FOR THE FILLING
3.4-3.56 oz instant chocolate pudding mix
1 1/2 c. milk 
1 1/2 c. whipped topping

FOR THE FROSTING
1 stick of butter, softened
3 1/2 c. of powdered sugar, sifted
2/3 c. cocoa powder, sifted
7-8 tbsp. heavy cream (or milk)

FOR THE TOPPING
2 c. crushed cookie topping
Gummy worms

*If you are in a time crunch or wanting something less "homemade"-- make cake according to package directions. For the filling, use cool whip chocolate whipped frosting (sold in the freezer section). And for the frosting used canned frosting :) This will cut down on the prep time, significantly.

DIRECTIONS

For the Cupcakes:
In the bowl of a stand mixer fitted with whisk attachment, sift in cake mix (to prevent lumps). Then add in eggs, milk and butter, mixing ingredients until creamy. Mix on low for 1 minutes and then on high for 1 minute. The batter should be thick and creamy. Line cupcake pan with liners. Using an ice cream scoop fill liners 2/3 of the way full. Bake for 18-20 minutes until inserted toothpick comes out clean. Allow to completely cool. Then hollow out the center portion of the cupcake (I use a cupcake corer). Keep the tops of the part you removed.

For the Filling:
In a medium bowl, whisk together pudding and milk for approximately 2 minutes, until well combined. Refrigerate until pudding is firm and set. Then fold in whipped topping. Pipe or fill cupcakes holes with mousse. Cover with a piece of the cupcake top.

For the Frosting:
In the bowl of a stand mixer fitted with paddle attachment, cream together butter and powdered sugar. A dough like consistency will be reached at this point. Slowly mix in 4 tsbp. of heavy cream. Once a creamy consistency is reached, mix in cocoa powder. Again, a thicker consistency will be reached. For a smooth and creamy consistency (that will be easy for piping), mix in 3 tbsp. of heavy cream. If desired consistency is still not reached, add additional tbsp. of heavy cream. Pipe onto or cover cupcake (to help, you can use the ice cream scoop to form the mound).

For the Topping:
Using a food processor, crush the chocolate cookies (I bought those store brand double chocolate filled cookies -- it worked perfect). Place cookie crumbs in a small bowl. Roll the tops of the cupcakes into the cookie crumbs to coat.

Cut two slit into the cupcakes and insert worms. You want the worm to look like it is going in and coming out. So I made sure the part of the worm that was inserted into the cupcake was the same color. See pictures above.

Enjoy,
Chika

25 October 2013

No Bake Oreo Truffle Eyeballs


Day 2 of my Spooktacular countdown to Halloween!!! Whoo! :) I will make this short and sweet (haha...sweet...get it?) Because this is part 2 of a two part post. Click here to see my No-Bake Oreo Truffle (i.e., Oreo Truffles minus the Eye ball ;) -- when you want to make Oreo truffles any other time of year).

The hubby has a work Halloween party each year where they host a competition for the most ghoulish dessert. I noticed that when searching for "ghoulish" or creepy Halloween desserts, there is not much out there. Plus, when looking for something that looks creepy but is easy to make, it is especially hard to find :/ Trust me, I have spent hours searching for treats and foods to make for my Spooktacular countdown. Sure, I could just make anything but that would not be fun!

::queue superhero music:: For the Love of Dessert to the rescue ;) hahaha..just kidding. In doing a Google search I found this picture of a cakeball or truffle eyeball (did not know which, because the link did not take me to the recipe -- don't you hate that?!?) and since I was already going to make Oreo Truffles -- I decided to tweak what I saw, so that it would be something anyone could make. And sure enough, I got a delicious recipe that was yummy that looked just a bit creepy! This would be a fantastic Halloween party treat that catches people eyes and their tummy! And if you want you can do what I did, make half as regular truffles and half as eye balls. For those squeamish people who might not want to digest eyeballs ;)


OREO TRUFFLE EYEBALLS
A For the Love of Dessert Original Recipe

INGREDIENTS

1 regular or family size package of Oreos, finely crushed 
8 oz. cream cheese (slightly softened)
12 oz of white candy melts or baking chocolate 
1-2 tsp. vegetable oil
7 oz. pack of Life Savers Gummies 
Chocolate chips
Red pen with edible ink

*Ghiradelli's chocolate melts are delicious but regular store brands work too.

DIRECTIONS

Making the Oreo Truffles:
First crush Oreos. Here is what you can do:
  • The  Oreo pack comes in three columns. I divided each column in half. I placed each of the these "batches," one at a time, in the food processor to get a nice, even consistency of crushed Oreo. If you put too many Oreo in the food processor at once, you are likely to get lumps of cookie that are not crushed
  • If you do not have a food processor- you can crush the Oreos by placing each batch in (1) in a blender or (2) in a freezer size Ziplock back and crushing them by hand or with a rolling pin.
After each batch was crushed, I dumped them into the bowl of a stand mixer, fitted with paddle attachment. Once all the Oreo have been crushed and placed in the bowl- add in the cream cheese. Mix until well combined and a dough like consistency has formed. When you have reached a dough like consistency- roll into 1 inch sized truffles. Place in freezer for 15 minutes or in refrigerator for at least 30 minutes.

Dipping the Oreo Truffles:
In the meantime, melt either chocolate bark or candy melts according to package directions. This is my secret, once the chocolate is melted I stir in the vegetable oil. This makes the chocolate have a smoother and shinier coating :)

Now, I am going to tell you how I get perfectly dipped cake truffles but if you have your own method that works-- you are more than welcome to do it that way--this is just whats worked best for me. Once chocolate has melted, take an Oreo truffle and while holding the top half, dip the bottom half into the chocolate, then dip a cake pop stick into the chocolate (about 1/2 inch) and push into the center of the truffle until about, no more, than half way through. Let cool. This will make it much easier to dip the rest of the truffle- otherwise I have found that the truffle either gets stuck in the chocolate or falls off the stick.

Once cooled, dip the top of the truffle and a little part of the bottom, that was already coated into the chocolate. Immediately center a Life Saver on the top of the Oreo truffle (Life saver writing side diwn). Then place a chocolate chip, upside down (point down), into the center of the Life Saver. Push down and hold Life Saver and chocolate chip for 2 seconds to set in. Allow to cool by sticking into flower foam. Once dried- holding the truffle with one hand, gently twist (while pulling slightly down) the cake pop stick with your other hand, and pull the stick out. Using your red pen with edible ink, draw veins.

Enjoy,
Chika


No Bake Oreo Truffles


When I was dating the hubby for just a few months, he had come over to my apartment with a friend. I was making him brownies (yes from a box) because I wanted to do something special. His friend asked the hubby if I was a good cook. My ears perked up because I wanted to know the answer (of course -- every girl, or at least me, wants a guy they are interested in, to think they are a good cook. Especially if we were just newly dating, I thought it would be a good indicator of what he thought about our relationship and me long term). Well, the hubby responded along the lines of -- I was a good cook as long as it came out of a box! ::insert shock, disgusted face:: I was not a happy camper. But I did not want to throw a fit, so I just kept my head down. I was angry and sad. From that moment on, I just knew I wanted to rub those words in his cute face ;) And each year I worked on my culinary skills until now -- having a blog, with every post, I do in fact bring up this very story and rub it in! ;) He has to eat his own words so to say!

I am an Oreo addict. If there was a 12-step Oreo program, I would definitely be the perfect candidate for it. I sneak Oreos when no one is looking and crave it non-stop...it's bad... I have made several Oreo recipes before. And I never seem to get tired of Oreos or cookies n' cream recipes. There is just something so overwhelming delicious about Oreos. I mean seriously!?! Though I have to say, that most people love the Oreo filling but for me, I am all about the cookie. which is perfect because the hubby loves the filling and I love the cookie :) See, we were just meant to be. But really, I have never met anyone who hates Oreos. It's like not being a fan of puppies! ;)

I never tried Oreo Truffles until I moved to Texas. I went to a Christmas party my in-laws were hosting and someone had made these. The hubby was immediately hooked. But at the time I did not know what they were, because it was a big party and I didn't know who to ask about making them. Then, we had a party through our program and another student had made these. I thought to myself, that I was clearly missing out and needed to figure out how to make these ASAP. The first time I made these (way before I started blogging) they came out miserably. My Oreos broke apart in the chocolate and the chocolate went all over the place. But with time, and learning my own way to dip cake balls and truffles, I have mastered the Oreo Truffle. I've made a No Bake Golden Oreo Truffle recipe before as well, so check it out! These babies are delicious and addicting. Trust me when I say that you cannot just have one Oreo Truffle. They are super easy to make, but dipping can be tricky. Definitely will be a hit at any party!


OREO TRUFFLES 
A For the Love of Dessert Original Recipe 

INGREDIENTS 

1 regular or family size package of Oreos, finely crushed 
8 oz. cream cheese (slightly softened)
12 oz of white candy melts or baking chocolate 
1-2 tsp. vegetable oil
Sprinkles 

*Ghiradelli's chocolate melts are delicious but regular store brands work too.

DIRECTIONS

Making the Oreo Truffles:
First crush Oreos. Here is what you can do:
  • The  Oreo pack comes in three columns. I divided each column in half. I placed each of the these "batches," one at a time, in the food processor to get a nice, even consistency of crushed Oreo. If you put too many Oreo in the food processor at once, you are likely to get lumps of cookie that are not crushed
  • If you do not have a food processor- you can crush the Oreos by placing each batch in (1) in a blender or (2) in a freezer size Ziplock back and crushing them by hand or with a rolling pin.
After each batch was crushed, I dumped them into the bowl of a stand mixer, fitted with paddle attachment. Once all the Oreo have been crushed and placed in the bowl- add in the cream cheese. Mix until well combined and a dough like consistency has formed. When you have reached a dough like consistency- roll into 1 inch sized truffles. Place in freezer for 15 minutes or in refrigerator for at least 30 minutes.

Dipping the Oreo Truffles:
In the meantime, melt either chocolate bark or candy melts according to package directions. This is my secret, once the chocolate is melted I stir in the vegetable oil. This makes the chocolate have a smoother and shinier coating :)

Now, I am going to tell you how I get perfectly dipped cake truffles but if you have your own method that works-- you are more than welcome to do it that way--this is just whats worked best for me. Once chocolate has melted, take an Oreo truffle and while holding the top half, dip the bottom half into the chocolate, then dip a cake pop stick into the chocolate (about 1/2 inch) and push into the center of the truffle until about, no more, than half way through. Let cool. This will make it much easier to dip the rest of the truffle- otherwise I have found that the truffle either gets stuck in the chocolate or falls off the stick.

Once cooled, dip the top of the truffle and a little part of the bottom, that was already coated into the chocolate. Immediately cover with sprinkles and allow to cool by sticking into flower foam. Once dried- holding the truffle with one hand, gently twist (while pulling slightly down) the cake pop stick with your other hand, and pull the stick out.

If you love these check out my No Bake Golden Oreo Truffles and No Bake Red Velvet Oreo Truffles.

Enjoy,
Chika

Blog design by Bella Lulu Ink