.widget.Profile .widget-content>a img.profile-img { min-width: 80px!important; min-height: 80px!important; max-width: 80px; border-radius: 40px; } .widget.Profile .widget-content>a img.profile-img { float: center; } .widget.Profile { text-align: center; float: center; margin: auto; }


Showing posts with label Red Velvet. Show all posts

10 May 2015

No Bake Red Velvet Oreo Trufles


The big move keeps creeping closer! Now that we found a place and rented a moving truck -- it's all about wrapping up the little things. But it is always the little things that add up and make you a little bonkers. On top of that I am co-hosting both a bachlorette party and a baby shower in the same week. ::breathe in and breathe out:: Thankfully, I have a few celebrations squeezed in. Last Thursday we had an end of the semester/we are going off to internship celebration at Napa Flats. I was excited because I heard really good things about this place. I got the blackened red fish, tried a bit of the poblano mac n' cheese and had the Ghiradelli brownie.


The dinner was super fun. But I cannot say the same about the food. It was a total let down. The food was completely bland and eh -- I am pretty sure I could have bought a frozen fish, chopped up some vegetables and still got something yummier. Which is absolutely pathetic for a restaurant of the caliber they claim to be.


I tasted the poblano mac n' cheese -- which was decent. The concept sounds amazing and I will probably try to make it for the hubby -- but it was a white mac n' cheese with maybe a hint of poblano. It was delicious only in that it was mac n' cheese. I finished with the brownie topped with cookies n' cream gelato. It was good but not amazing -- but who am I to turn down a free brownie?!?


So its dessert time :) I was a big fan of the seasonal Red Velvet Oreos that were released for Valentine's Day. And took down a pack in less time than a normal person should ever do. I thought I would never see them again, but a little while ago the local Target had a close out sale on them! Well, I could not just let them go to waste. I knew I had to use them to make truffles and spread the joy that is Red Velvet Oreos to others. Sure enough everyone who tried them, loved them. I think the words used were yummy, delicious, and super moist. Dear Nabisco - I really hope you bring these delicious cookies back! Until then you can still buy these on Amazon.


RED VELVET OREOS TRUFFLES

INGREDIENTS 

1 (10.7 oz) package of Red Velvet Oreos
4 oz. cream cheese, room temperature
10-12 oz. of vanilla almond bark
1-2 tbsp. of olive oil
Red sprinkles

DIRECTIONS

Making the Oreo Truffles:
First crush Oreos. Here is what you can do:
  • The  Oreo pack comes in three columns. I placed each of the these "batches," one at a time, in the food processor to get a nice, even consistency of crushed Oreo. If you put too many Oreo in the food processor at once, you are likely to get lumps of cookie that are not crushed
  • If you do not have a food processor- you can crush the Oreos by placing each batch in (1) in a blender or (2) in a freezer size Ziplock back and crushing them by hand or with a rolling pin.
After each batch was crushed, I dumped the crushed Oreos into the bowl of a stand mixer, fitted with paddle attachment. Once all the Oreo have been crushed and placed in the bowl- add in the cream cheese. Mix until well combined and a dough like consistency has formed. Place in the fridge for 15-20 minutes. Roll into 1 inch sized truffles. Place in freezer for 15 minutes or in refrigerator for at least 30 minutes.

Dipping the Oreo Truffles:
In the meantime, melt either chocolate bark or candy melts according to package directions. This is my secret, once the chocolate is melted I stir in the vegetable oil. This makes the chocolate have a smoother and shinier coating :)

Now, I am going to tell you how I get perfectly dipped cake truffles but if you have your own method that works-- you are more than welcome to do it that way--this is just whats worked best for me. Once chocolate has melted, take an Oreo truffle and while holding the top half, dip the bottom half into the chocolate, then dip a cake pop stick into the chocolate (about 1/2 inch) and push into the center of the truffle until about, no more, than half way through. Let cool. This will make it much easier to dip the rest of the truffle- otherwise I have found that the truffle either gets stuck in the chocolate or falls off the stick.

Once cooled, dip the top of the truffle and a little part of the bottom, that was already coated into the chocolate. Immediately cover with sprinkles and allow to cool by sticking into flower foam. Once dried- holding the truffle with one hand, gently twist (while pulling slightly down) the cake pop stick with your other hand, and pull the stick out.

If you love these check out my No Bake Oreo Truffles and No Bake Golden Oreo Truffles.

Enjoy,

11 February 2014

Red Velvet Puppy Chow


Before I continue on with my, probably not so exciting recap of my BIRTHDAY, I wanted to say that it is so nice to have this blog where I can write about random things that I have to share, thoughts that come across my mind (like this tangent) and food that I LOVE :) Why this random comment? I have been having a stressful February, which says a lot since graduate school is one big stress ball...yes I may make up words and yes...stress ball works ;)


Well, after going to the baby shower I headed back to have dinner with my besties. They are gorgeous right?!? I LOVE my besties AND if you happen to be one of the two people who read this blog ;)....you probably know that I talk about Paulina and Stephanie all the time because I truly feel blessed to have them in my life.

This sums up our friendship perfectly!

 As I have gotten older ::cough later twenties....sad face:: I have met many people -- those that became friends but overtime faded away as well as I've seen other people and the development of their friendships. Rarely do I see people keep a strong tie to their friends as they get older and get married. Even more, rarely do I see people keep their high school friends when they go off to college. Well, I have both in them. Paulina, Stephanie and I are going on 13 years of friendship :) We have gone through graduations, first boyfriends, break ups, love, death, engagements, marriages....all the worst and best of life....together. They support me, love me, truly care about me and want whats best for me. I know if I need anything....they would give it to me or help me achieve it. And I feel the same for them. I am so thankful for our friendship.


I had such a nice dinner with them because it's always filled with non-stop laughter. The laughter that makes your stomach hurt because you are laughing so hard. But it just feels so good to laugh that much. And, oddly at the same time we have deep conversations that you would never have with anyone else. My time with them, is always....just that awesome :)

I got to try a "new" restaurant -- by new I mean since I moved away from Cali, it was built, but it's not actually "new." It's called Wokcano and it had the best calamari I have ever had!


And on a side note: Paulina is getting hitched in Cancun, Mexico! I got her beautiful invite in the mail and I just booked the hubby and I's flight/hotel. I am BEYOND excited to spend a vacay with my besties :) I have never traveled with them, so this will be a first! :)

It is half way through my Valentine's Day countdown (I thought I'd spare you the Countdown to Love this time ;) and so I wanted to do a bonus day. This is the first of three puppy chow recipes I want to share with you. Okay, I went puppy chow crazy and then  "blamed" it on this countdown to have an excuse....don't judge me...because once you eat it, you'll know why. I gained 5 pounds just eating this red velvet puppy chow....WHY!?!?! Did I find this.....because the universe loves me! hahaha...this can get a little messy but is super easy to make and fun!


RED VELVET PUPPY CHOW
Slightly adapted from from Your Cup of Cake 

INGREDIENTS

5 c. Rice Chex cereal
3/4 c. white chocolate chips
1/4 c. milk chocolate chips
2 oz. or 1/4 c. of cream cheese
1 1/2 tbsp. milk
1 1/4 c. Red Velvet Cake mix
1/4 c. powdered sugar
Red velvet M&Ms

DIRECTIONS

In a large tupperware (or mixing bowl with lid) measure out 5 c. of Rice Chex cereal. In a separate bowl, sift and then whisk together red velvet cake mix and powdered sugar -- set aside.

Microwave chocolate chips until melted, be careful not to burn the chocolate. If the microwave just does not work for you, you can try a double broiler. Once melted, stir in cream cheese and milk. The melted chocolate will get much thicker, but this is okay.

Pour chocolate over Rice Chex cereal. Then using a spatula fold the chocolate into the Rice Chex cereal, until well coated. Dump red velvet-powdered sugar into the tupperware and seal with lid (alternatively you can use a large ziplock freezer bag -- which is easier for clean up). SHAKE....put on some music...dance with it...but SHAKE IT LIKE A SALT SHAKER ;) Just keep shaking....

Once Rice Chex cereal is well coated in red velvet-powdered sugar mix, dump onto large cookie sheet and let cool. Mix in red velvet M&Ms and serve :)

Enjoy,
Chika

08 February 2014

Red Velvet M&M Cake Mix Bars


::insert scream here:: isn't text scream something like ?!@!#$?!@@!! -- or maybe that is swearing. hahaha. I am definitely trying to scream and not swear. Anywhoo, I am so sorry that I have once more went MIA for bit. I was venting to the hubby how frustrated I get, that I cannot ever seem to blog regularly for a consistent amount of time, even when I have recipes to share. It is just plain annoying. He gave me some good feedback and pointed out that I just need to be honest with you all and myself.

(...tangent....doesn't this sound like a break up speech...hahah...where I am about to say. 'it's not you, really, it's me'...don't worry this is not where this is going)


And basically -- I just need to be open about that fact that at any random moment, even when I think I'll be free, graduate school will sweep in and take over my life. You know, people have always told me, "it'll be worth it." My response instead of "yea I know.."...is now "I will let you know about that." hahaha...The worst part?!? First year faculty have told me that it only gets worse?!?! WORSE!?!? Like whaaaaaaa? Not.Even. So what does that say about the future... :/ That is why not blogging is so annoying. Not only does that mean I have nothing to share with you all. But I stop doing one of the few things that help me de-stress, unwind and smile. Maybe, just maybe, one day I'll find a balance. But as of now, I'm failing. It's okay, not in a sad way, just in a...I am so sorry way :) Forgive me? Again?


So what have I been up to? Well....IT WAS MY BIRTHDAY last month. And if you remember, I love my birthday. It's like a national holiday for me. I go all out and pretty much get everything I want for my birthday. I know, that sounds absurdly spoiled. I cannot lie and say I am not. I am extremely blessed with my loving hubby, family and besties. And they understand just how much, for some odd reason, my birthday means to me. This year, the hubby and I went home to California for my birthday! :) It was so nice. I had such a fun an amazing time! I'll share bits of my trip in each post after this!


This is Day 1 of my Valentine's Countdown :) The countdown to love....hahaha! And what screams Valentine's Day like RED VELVET! Plus, M&Ms came out with a seasonal red velvet flavor and they are delicious! Addicting, really....So  I decided to make my M&M Cake mix bars, because my last one was such a big hit. And these were also definitely a hit. Took them to a party and they were all gone :) The hubby only got to try the edges and he was bummed that was all he got. This is as easy peasy to make as it gets! So if you are in a pinch and want an easy, go-to treat....this....is....it!


RED VELVET M&M CAKE MIX BARS
Cake mix bars from Inside a BruCru Life

INGREDIENTS

Preheat Oven to 325F Degrees 

1 box of Red Velvet Cake mix
1 egg
1 stick of butter, softened
1 tsp. vanilla
9.9 oz bag of Red Velvet M&Ms (or Valentine's M&Ms)*

*I only found the Red Velvet M&Ms at Wal-mart

DIRECTIONS

Line a 7 3/4 x 11 3/4 baking dish with aluminum foil. Grease aluminum foil with butter, shortening or cooking spray. This will help when removing bars from baking dish, allow for cooling, and easier, cleaner cutting into squares.

In the bowl of a stand mixer fitted with paddle attachment, sift in cake mix. Then stir in egg, butter and vanilla. Do not over mix. Remove from stand mixer and fold in half of the red velvet M&Ms.

Evenly press dough into baking dish. Sprinkle the remaining M&Ms evenly onto the top of the batter and gently press in. Bake for 35-40 minutes or until inserted toothpick comes out clean. Allow to completely cool before cutting into bars.

Enjoy,
Chika

16 December 2013

Red Velvet Peppermint Thumbprint Cookies


It was really nice being in Houston last week. Not only did I get to spend the week with a major cutie pie, but I got to go back to a place that has lots of sweet memories (since that is the city I met the hubby) and try out new places for dinner with my cousin. The first night there she took me to a Korean BBQ place. While heading there, I saw a restaurant called Fat Bao. I love Bao! Isn't that the funniest name?!? I LOVED it. Well the next night the hubby was coming down to visit, because I wanted him to meet the baby plus I get homesick from him and Ninja. I mentioned this Bao place to him and he chose it for our place for dinner the next night.


Everything there was so yummy. It's more on the pricey side for the portions you get but you are also paying for the novelty of the food. But it is so well worth it. They had Asian style fries. We ordered "Fat Fries" which came with a spicy kimchi sauce, vegetables and pork. Completely drool worthy :) Then I ordered a pork bao and a smoked salmon bao...also completely drool worthy. The hubby got a duck bao and a fish bao...also amazing! We finished dessert with a s'moers bao! It was a deep fried bao filled with NUTELLA and marshmallow cream.........OMG.....I am getting hungry now and almost tempted to make the 2 hour trek from College Station to Houston. Don't judge me, I just love and appreciate food. If you are ever in Houston, I really suggest you try this place. And, no, they have no idea I am plugging them right now :)


Nothing says Christmas more than the colors red and green or the flavor peppermint. Well, I decided to use both and make red velvet peppermint thumbprint cookies. They look absolutely beautiful and they taste great. I love the look of these, they look so festive! I used a red velvet pudding cookie as the base (of course I would right?! My addiction for pudding cookies runs deep. What can I say?) and Peppermint Hershey Kisses. The hubby took it to work last week and it went fast (I also made him take the mint truffle crinkle blossoms). I also took a few down to my cousin and she seemed to really like them.


RED VELVET PEPPERMINT THUMBPRINT COOKIES 
A For the Love of Dessert Original Recipe 

INGREDIENTS

Preheat Oven to 350F Degrees

2 1/4 c. flour
2 tsp. baking soda
1 (3.4-3.56 oz.) package of chocolate pudding
1 1/2 sticks of butter, softened
1/4 c. sugar
3/4 c. brown sugar
2 eggs, room temperature
1 tsp. vanilla
1-2 tbsp. red food coloring
10 oz. bag of Peppermint Hershey Kisses

DIRECTIONS

In a medium bowl, whisk together flour, baking soda and pudding mix. Set aside. In the bowl of a stand mixer fitted with paddle attachment, mix together butter and sugar, until light and fluffy (approximately 5-8 minutes). Add in eggs, one a time, mixing until incorporated (after each egg, scrape down the sides of the bowl before mixing again). Next, mix in vanilla, followed by red food coloring.
  • For food coloring, add in 1 tbsp. first. Then slowly add in more, until desired color is reached. Note- the batter will get slightly darker when adding in dry ingredients. After all, we are using chocolate pudding.
Slowly add in dry ingredients, one cup at a time, mixing until just incorporated. Similar to the eggs, scrape down the sides of the bowl, before mixing again. Last, mix in chocolate chunks.

Place batter in the refrigerator for abut 5-10 minutes, to allow the batter to harden a bit. Line baking sheet with a baking mat, aluminum foil, parchment paper or wax paper. Scoop out 1 1/2-2 inch, large cookie dough balls onto sheet (roll between palms of your hands for a nice round shape). Space the cookies 2 inches apart, press down slightly, and bake for 10-12 minutes. The cookies do not spread too much. Immediately remove from oven and press a Hershey peppermint kiss into the top center of each cookie. Let rest for 1 minute and then gently jiggle the cookie to make the Hershey kiss drop into a thumbprint.

Merry Christmas (it is just past midnight!),
Chika 

25 August 2013

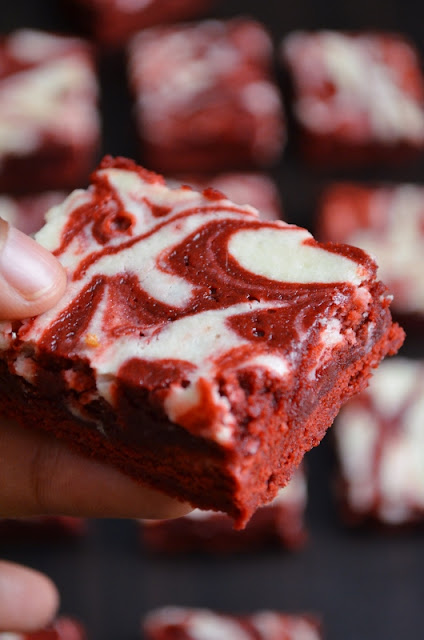
Red Velvet Cheesecake Swirl Brownies


Happy Sunday. Today marks the end of summer vacation. Though, I am not sure I can say that being in graduate school, seeing we do not get the summers off. Either way, the little kid inside me sighs with sadness at the death of summer and the beginning of fall. But this year, I feel differently. For the first time since starting school, I can say that my clinical and academic (e.g., classes) responsibilities have subsided and my time can be focused on research. Do not get me wrong, I love working with kids and I always love learning new things, but I adore research and so to have my "job" be research is exciting and gives me more flexibility in my schedule :) So I am eager to see what this school year brings and holds! But I am still teaching this semester-- but I don't mind-- I kinda like it!

I apologize for not blogging for the past two days. I promise it was not out of lack of desire, but more out of pure frustration. On Friday, I made these Red Velvet Cheesecake Swirl Brownies that I was just dying to make for our dog park's "Beer and Baked Goods" Fridays. Odd, yes, but makes sense if you know the group. Though neither the hubby and I drink, we do love our baked goods. I usually am not the provider of yumminess on Friday because we have some other wonderful bakers. But lately, I have been sending some treats. It gives me the chance to try out new recipes and have people eat them, so that it is not lying around the house tempting me and the hubby. Although the brownies came out good and I sent them with the hubby to take to the dog park-- it did not come out like I wanted. Ugh! And since I had it in my head that I was going to post a dessert recipe- this brownie recipe -- I went on strike against posting until I could make these brownies the right way!

Saturday, I just avoided, huffing and puffing about how my recipe did not come out well and just being mad. Really a big baby stubborn genius ;) This morning, I woke up randomly motivated  and I was determined to make these Red Velvet Cheesecake Swirl Brownies, the right way! Have you ever tried a recipe from a blog or on-line and it just did not come out like how theirs did? That is exactly what happened for me! I found this recipe on Sally's Baking Addition- and no matter what-- it did not work for me.You would think second time worked--since usually the first time is fine. NO! It took 3 times- I guess what they say is true-- third time is a charm! I gave up on the original recipe-- looked around at more recipes, tweaked it a little and came out with a version that worked for me. And I think it came our perfect and delicious! Finally!


RED VELVET CHEESECAKE SWIRL BROWNIES
Red Velvet Brownie adapted from Smells Like Home
Cheesecake Swirl adapted from Sally's Baking Addiction

INGREDIENTS

Preheat Oven to 325F Degrees

FOR THE BROWNIES
1 1/8 c. all purpose flour
1/3 c. cocoa powder
1- 1 1/2 stick of butter softened (add 1/2 if sugar is not dissolving)
1 3/4 c. sugar
2 eggs, room temperature
2 tsp. vanilla
1 tbsp. red food coloring

CHEESECAKE SWIRL
4 oz. cream cheese, softened
1/4 c. sugar
1 egg
1/2 tsp. vanilla 

DIRECTIONS

For the Brownies:
In a small bowl sift and whisk together flour and cocoa powder. Set aside. In the bowl of a stand mixer fitted with paddle attachment, cream together butter and sugar until light and fluffy. Sugar should dissolve. Approximately 2-4 minutes. Add in eggs, one at a time, mixing well after each addition. Then stir in vanilla followed by red food coloring. On low speed, add in dry ingredients, mixing until just incorporated. Remove from mixer, and fold batter using a spatula to make sure that flour at the bottom was incorporated and food coloring is evenly distributed.

For the Cheesecake Swirl:
In the bowl of a stand mixer fitted with paddle attachment, cream together cream cheese and sugar. Then add in egg followed by vanilla.

Assemble the Brownie:
Line a 7x11 or small rectangular baking dish with aluminum foil. Not an 8x8 -- that did not work for me! Then grease aluminum foil. This will help with removing brownies from baking dish and cutting the brownies. Pour the batter into the prepared baking dish (reserving 3-4 tbsp. batter). Using a small 1 inch cookie scoop or tbsp. scoop out cheesecake batter and place randomly over batter. You may not need to use all the cheesecake batter. Top these cheesecake scoops with remaining red velvet brownie batter. Using a small, sharp knife make swirls in the batter. I did this by making horizontal lines and then vertical lines. 

Baking:
Loosely cover with aluminum foil (so that top of the brownie does not get burnt). Place baking dish on the bottom rack and bake for 30-40 minutes. Then remove aluminum foil and bake on top rack for an additional 10-15 minutes until inserted toothpick comes out clean. This may take more or less time for you--depending on your oven, what is important is that an inserted toothpick comes out clean. Allow brownies to completely cool in baking dish for at least one hour. Using the edges of the aluminum foil, pull out brownies from baking dish- and cut into bars.

Enjoy,
Chika

Blog design by Bella Lulu Ink