.widget.Profile .widget-content>a img.profile-img { min-width: 80px!important; min-height: 80px!important; max-width: 80px; border-radius: 40px; } .widget.Profile .widget-content>a img.profile-img { float: center; } .widget.Profile { text-align: center; float: center; margin: auto; }


25 August 2013

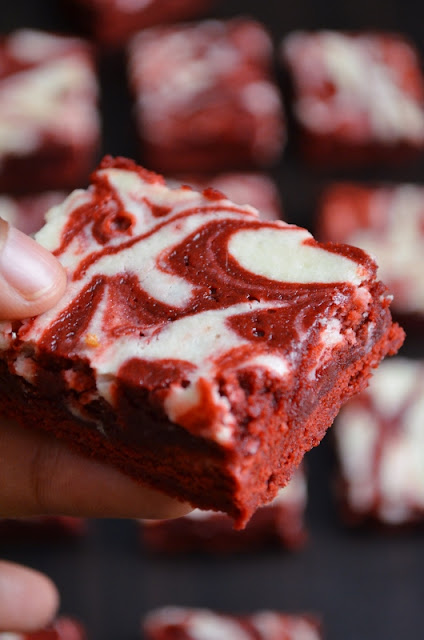
Red Velvet Cheesecake Swirl Brownies


Happy Sunday. Today marks the end of summer vacation. Though, I am not sure I can say that being in graduate school, seeing we do not get the summers off. Either way, the little kid inside me sighs with sadness at the death of summer and the beginning of fall. But this year, I feel differently. For the first time since starting school, I can say that my clinical and academic (e.g., classes) responsibilities have subsided and my time can be focused on research. Do not get me wrong, I love working with kids and I always love learning new things, but I adore research and so to have my "job" be research is exciting and gives me more flexibility in my schedule :) So I am eager to see what this school year brings and holds! But I am still teaching this semester-- but I don't mind-- I kinda like it!

I apologize for not blogging for the past two days. I promise it was not out of lack of desire, but more out of pure frustration. On Friday, I made these Red Velvet Cheesecake Swirl Brownies that I was just dying to make for our dog park's "Beer and Baked Goods" Fridays. Odd, yes, but makes sense if you know the group. Though neither the hubby and I drink, we do love our baked goods. I usually am not the provider of yumminess on Friday because we have some other wonderful bakers. But lately, I have been sending some treats. It gives me the chance to try out new recipes and have people eat them, so that it is not lying around the house tempting me and the hubby. Although the brownies came out good and I sent them with the hubby to take to the dog park-- it did not come out like I wanted. Ugh! And since I had it in my head that I was going to post a dessert recipe- this brownie recipe -- I went on strike against posting until I could make these brownies the right way!

Saturday, I just avoided, huffing and puffing about how my recipe did not come out well and just being mad. Really a big baby stubborn genius ;) This morning, I woke up randomly motivated  and I was determined to make these Red Velvet Cheesecake Swirl Brownies, the right way! Have you ever tried a recipe from a blog or on-line and it just did not come out like how theirs did? That is exactly what happened for me! I found this recipe on Sally's Baking Addition- and no matter what-- it did not work for me.You would think second time worked--since usually the first time is fine. NO! It took 3 times- I guess what they say is true-- third time is a charm! I gave up on the original recipe-- looked around at more recipes, tweaked it a little and came out with a version that worked for me. And I think it came our perfect and delicious! Finally!


RED VELVET CHEESECAKE SWIRL BROWNIES
Red Velvet Brownie adapted from Smells Like Home
Cheesecake Swirl adapted from Sally's Baking Addiction

INGREDIENTS

Preheat Oven to 325F Degrees

FOR THE BROWNIES
1 1/8 c. all purpose flour
1/3 c. cocoa powder
1- 1 1/2 stick of butter softened (add 1/2 if sugar is not dissolving)
1 3/4 c. sugar
2 eggs, room temperature
2 tsp. vanilla
1 tbsp. red food coloring

CHEESECAKE SWIRL
4 oz. cream cheese, softened
1/4 c. sugar
1 egg
1/2 tsp. vanilla 

DIRECTIONS

For the Brownies:
In a small bowl sift and whisk together flour and cocoa powder. Set aside. In the bowl of a stand mixer fitted with paddle attachment, cream together butter and sugar until light and fluffy. Sugar should dissolve. Approximately 2-4 minutes. Add in eggs, one at a time, mixing well after each addition. Then stir in vanilla followed by red food coloring. On low speed, add in dry ingredients, mixing until just incorporated. Remove from mixer, and fold batter using a spatula to make sure that flour at the bottom was incorporated and food coloring is evenly distributed.

For the Cheesecake Swirl:
In the bowl of a stand mixer fitted with paddle attachment, cream together cream cheese and sugar. Then add in egg followed by vanilla.

Assemble the Brownie:
Line a 7x11 or small rectangular baking dish with aluminum foil. Not an 8x8 -- that did not work for me! Then grease aluminum foil. This will help with removing brownies from baking dish and cutting the brownies. Pour the batter into the prepared baking dish (reserving 3-4 tbsp. batter). Using a small 1 inch cookie scoop or tbsp. scoop out cheesecake batter and place randomly over batter. You may not need to use all the cheesecake batter. Top these cheesecake scoops with remaining red velvet brownie batter. Using a small, sharp knife make swirls in the batter. I did this by making horizontal lines and then vertical lines. 

Baking:
Loosely cover with aluminum foil (so that top of the brownie does not get burnt). Place baking dish on the bottom rack and bake for 30-40 minutes. Then remove aluminum foil and bake on top rack for an additional 10-15 minutes until inserted toothpick comes out clean. This may take more or less time for you--depending on your oven, what is important is that an inserted toothpick comes out clean. Allow brownies to completely cool in baking dish for at least one hour. Using the edges of the aluminum foil, pull out brownies from baking dish- and cut into bars.

Enjoy,
Chika

23 August 2013

Chicken Jalapeno Popper topped Portobello Mushrooms


I have been so off my game this week--missing and coming late to meetings. I think a set fall school schedule will help keep me on track, or let's hope so. Though with school back in the swing of things only means less time for hobbies :/ (i.e., baking, cooking and blogging) ::tear::

It took me forever, but I finally got around to updating "My Top 5 Sweet Tooth Picks" and "My Top 5 Savory Picks"! You can see these updated lists on the right side of this blog underneath the "Popular Posts" section. Really, my lack of updating was out of laziness. Since I first created those two lists, I have made a ton of recipes. Some of which I have beyond loved! And the other day, I was looking at those lists and realized just how out of date and non-reflective of my favorites they were. So I decided it was time that I updated it. Out of the 10 recipes, 2 were still my favorites. But everything else changed. Take a look! Though my favorites do not seem to overlap much with my most popular posts, I think you just might like what I picked! :) After all the first time I made those list-- Crispy Ritz Chicken and S'moreos (which is still on there) were on there-- but were not on my most popular posts list-- but now look-- they are-- so I'd like to think of my favorites lists as fortune tellers of what is to be popular ;)

I have made stuffed portobello mushrooms before but it has been awhile. I love, love, love, mushrooms. Ever since I was little. Though I am not a fan of raw mushrooms, I do love sauteed mushrooms. Which is why, though at first I wanted to make a traditional stuffed portobello mushroom-- I decided to really bake my mushroom so that it would be more tender and juicy (almost as if they were sauteed). And then I topped the the mushrooms with a chicken jalapeno popper stuffing. The look reminded me of Mexican Sopes. This recipe will definitely be a go-to favorite for me. It was semi-healthy, quick and simple. The hubby, whose not as much of a mushroom enthusiast as me-- loved the stuffing! He used the left over stuffing as a spread to eat with some bread. He was addicted :)


CHICKEN JALAPENO POPPER TOPPED PORTOBELLO MUSHROOMS
A For the Love of Dessert Original Recipe

INGREDIENTS

Preheat Oven to 350F Degrees

4 portabello mushroom caps, cleaned
Olive oil for brushing

FOR THE STUFFING
1/2 large chicken breast, shredded*
4 oz. cream cheese, softened
2 tbsp. mayonnaise
3 tbsp. sour cream
1/2 c. grated Parmesan cheese
1/3 c. Panko bread crumbs  (+ some for garnish)
1 1/2 tbsp. jalapeno juice
1/4 c. diced jalapenos 
1 tbsp. garlic
2 green onions

*To shred chicken, place one chicken breast and 2 tbsp. chicken broth in a slow cooker. Cook on low for 4 hours. Using two forks, shred apart the chicken and allow to sit for an additional 15-20 minutes to soak up liquid. 

DIRECTIONS

For Mushrooms:
To prepare the portabello mushrooms- first remove the stem by pulling in the opposite direction in which it's learning (it should snap right off). If needed, take a knife and cut it off at the base. Remove the gills by cradling the portobello in one hand with the gills facing up, then use a small spoon to scrape the gills off, moving in a circular path (the gills should come out very easily, and you do not need to use a lot of pressure). Then using a damp paper towel, wipe the cap of the mushroom to remove any residual dirt. Using a brush- coat the mushroom caps with olive oil. Place mushroom caps on a line baking sheet and bake for 10-15 minutes until flat. If you do not want flat mushroom caps-- make stuffing first, fill mushroom caps and then bake 15-25 minutes, until tender.  Allow to cool.

For the Stuffing:
In a medium bowl, using a spatula, mix together cream cheese, mayonnaise and sour cream. Then fold in chicken, Parmesan cheese and Panko bread crumbs. Once well combined, add jalapeno juice and diced jalapenos followed by garlic and green onions.

Using an ice cream scoop- place one scoop of chicken jalapeno popper stuffing ontop of each portobello mushroom (still on baking sheet). Garnish with a little panko breadcrumbs.

Change oven setting to broil-- place topped mushroom caps under broiler and bake for 1 minute until Panko breadcrumbs are browned.

Enjoy,
Chika

22 August 2013

Roasted Vegetable Mac n' Cheese


I have decided to start a "My Pantry Must Haves" page. Which includes my pantry musts. Things I always have on hand-- so that anytime I want to make something-- even random things I may stumble on-- chances are I already have the ingredients and don't need to run to the grocery store. And when I run out, I always make sure to replace it right away! Check it out. Let me know what you think and if maybe I left out something important. I definitely plan on adding to it, because chances are I forgot something.

I have really enjoyed my second half of summer. Since I started undergrad, I have not had a summer off since September 2004! So I really needed the time off and even though I had a few meetings and appointments-- it was so nice. I got to spend time with Ninja, cleaning, cooking, baking and being a stay-at-home wifey. I would love to be  a stay-at-home mom one day and so this little "trial" time was great!  Definitely just made me want to be a stay-at-home mom, baker, clinical psychologist ;) Those exist right?!? Though, I think the hubby loved it more than me. Although he is such a sweetheart and is so helpful when I get busy with school; I think he loves having the time off--coming home to a clean house, warm meal and dessert!

This recipe for roasted mac n' cheese was one of the dishes I made for the potluck-game night that I had on Tuesday night that was Luke edible. I love me some meat, and so there are few vegetarian dishes that I really enjoy, but I very much enjoyed this recipe. Let's be honest, who does not love mac n' cheese? Combine that with some roasted, fresh summer veggies-- you get an awesome dish-- a creative twist to mac n' cheese. Plus, the panko crumbs adds a great crunch. Luke gave it the vegetarian, thumbs up! :) And took some for leftovers-- this recipe is a  little more complicated than other recipes that I post, but let's be honest it looks beautiful and is amazingly delish. So well worth your time.


ROASTED VEGETABLE MAC N' CHEESE
Adapted slightly from Comfort of Cooking 

INGREDIENTS

Preheat Oven to 400F Degrees

1- (8-10 oz) frozen, microwavable bag of broccoli florets
1 red pepper, diced
1 yellow squash, sliced into medallions
10 baby carrots, sliced
2 c. of elbow macaroni
1/4 c. olive oil
1 tbsp. garlic, minced
1 tsp. crushed red pepper flakes
3 tbsp. + 1 tsp. flour
1 1/2 c. heavy cream (milk)
2 c. shredded yellow cheese
salt and pepper to taste
1/2-3/4 c. panko bread crumbs

DIRECTIONS

In a large pot of salted boiling water-- cook pasta according to package directions. Drain excess water and run cold water through pasta to prevent sticking. Keep pasta in colander. Do not return to pot. 

While pasta is cooking, microwave broccoli according to package directions minus 1 minute. Allow to cool. Line a baking sheet with aluminum foil or a baking mat. Spray baking sheet with cooking spray and brush red pepper, squash and carrots with olive oil. Bake for 10 minutes Then add broccoli (drained if there is moisture) to the baking sheet. Continue baking for 5-10 minutes, or until vegetables have softened slightly. Remove from oven and set aside.

After pasta is cooked, use the large pot to heat olive oil over medium heat. Once hot, saute garlic and red pepper flakes until garlic is browned and fragrant. Do not over cook, as this will burn the garlic. Whisk in flour and cook for 1 minute. Gradually whisk in heavy cream, stirring constantly until mixture is slightly thickened. This can take some time, approximately 10-15 minutes-- but it will thicken. Remove from heat. Stir in shredded cheese until melted and smooth. Add salt and pepper to taste. Gently fold in macaroni and vegetables.

Turn oven to broiler setting. Grease a large (9x11 or 9x13 inch) casserole dish. Spread mac n' cheese in casserole dish and sprinkle panko breadcrumbs on top to completely cover. Place under the broiler in oven for 1-2 minutes, until the top is slightly browned.

Enjoy,
Chika

21 August 2013

Chocolate Brownie Trifle


I love playing hostess. I guess that is why, when I dream of the hubby and I's first home-- I picture something with a large, open floor plan and a huge kitchen :) I want a kitchen (and really a house) with lots of windows to provide natural lighting. Which will make food photography much easier. In our current place, I have no windows in the kitchen and one window in the living room. It makes for an annoying time taking pictures of my food-- C'est la vie. And I want a kitchen that I can bake and cook in while talking with guests (but then I guess who doesn't). Oh, really like a great room where the kitchen flows into a large living room with lots and lots of seating. I guess since the hubby and I have only lived in apartments-- I have not hosted too many get-togethers. The only people that I have had over for dinner have been Justin and Luke.


Well yesterday, I decided to host a potluck dinner and game night at our place. I really got to play hostess because this time there was more than just the 4 of us. It was the hubby and I, Justin and his girlfriend, Luke and Vince (another student in the graduate program). Luke brought a salad, Justin and his girlfriend brought a sausage dip and games, Vince brought drinks and I (and the hubby) made a Pierogi Casserole, Roasted Vegetable Mac n' Cheese and this brownie trifle. I wanted to make fully Luke edible dishes, since he is a vegetarian. Game night was a blast! We decided to play a game Luke, the hubby and I haven't played before-- called Outburst. It was really fun, though I thought a bit dated.  But I think that lead to a lot of good laughs and a very good time :) I think next time, I'd like to play Scategories-Categories again.

For this dessert, I was inspired by Luke's request to make something with Heath Bars in it. And, so I finally did it! I made my first trifle (or 6 mini trifles to be exact). I asked for a mini trifle set for my birthday. But haven't used them since I got them this past January! By using these mini trifle dishes, each person got their own "trifle" to eat. Plus, I think mini trifle dishes are prettier and cuter, don't you think? Though, I guess for a larger party, I would just need to make one large trifle. I guess a large trifle dish is going to be on my next year's birthday list :) Anywhoo, this was a dish of different layers of yumminess. The brownies made for a chewy chocolate layer, the pudding/whipped cream made a soft, creamy layer and the heath bits provided just the perfect amount of crunch. ::drool::


CHOCOLATE BROWNIE TRIFLE

INGREDIENTS

BROWNIE LAYER
1 (19.50 oz) box of fudge brownies (I used Pillsbury)
1/2 c. of vegetable oil
2 eggs, room temperature
1/4 c. of water

PUDDING LAYER
2- (3.5 oz) chocolate fudge pudding mix
4 c. milk

1 jar of caramel sauce
2- (8 oz) containers of whipped topping
1 (8 oz) bag of heath toffee bits

DIRECTIONS


For the Brownie Layer:
In the bowl of a stand mixer fitted with paddle attachment, combine brownie mix, vegetable oil, eggs and water until just incorporated. Grease a 9 x 11 or 9 x 13 baking dish and spread batter into greased pan. Bake for 30-35 minutes, until inserted toothpick come out clean. Allow to completely cool. Then cut into small square chunks. I cut my brownie into 12 strips width wise, and then each strip into small pieces. 

Pudding:
In a medium bowl, whisk together pudding mix and cold milk. Continue whisking until well blended. Refrigerate for 5 minutes until pudding is set. Set aside.

Assembling the Trifle:
If you are using mini trifle bowls- divide ingredients accordingly (e.g., I had 6 trifle dishes, so I divided all the ingredients into 12-- 2 layers x 6 trifle dishes; if you have one trifle dish, divide everything into two-- 2 layers x 1 trifle dish). 

Layer the trifle as follows (starting from the bottom to the top): chocolate pudding, brownies, drizzle a little caramel sauce over brownies, whipped topping, heath toffee bits, chocolate pudding, brownie, caramel drizzle, whipped topping, and heath toffee bits. Keep refrigerated until served.

Enjoy,
Chika

20 August 2013

Chicken Cesar Pasta Salad


The hubby is a big salad eater. He loves getting salads with fruit and other odd things in it.  Me not so much-- and I'm also not a big fan of mixing my sweet with my savory. You will probably never see that on my blog-- I think those are two things that are not supposed to mix. I know, a ton of people like mixing sweet with savory, but For the love of Dessert-- is not going to be one of them :) I do have two salads that I really enjoy: Chicken Cesar Salad and Southwestern Salads (w/ avocado and little tortilla strips, my favorite being from BJ Restaurant and Brewhouse). I guess, in the usual guy-girl dynamic, the hubby and I are switched. What I really love is pasta. So when I saw this recipe on Pinterest (duh)- I knew that making it would be in my near future :)

I hesitated a bit, only because the hubby does not like olives. I know! Weird right? What can I say about him-- he thinks one can have too much chocolate, does not like mangos or guavas (yet married a girl from an island), and now....does not like olives!?! The things you find out after marriage...it's okay....I still plan on keeping him ;) Well, yesterday, I asked him if I made a recipe with olives, would he mind-- being the weirdo sweetheart that he is-- he said yes-- so (already having bought the ingredients--I'm sneaky, what can I say?), I decided to make this. And I'm convinced that the hubby found his dislike of olives when he was younger- and let's be honest--our tastes change--if it did not, I think vegetables would go extinct and ice cream, chocolate and candy would rule the world. Though-I think I might like that world-- the world where Candy Land is real.

This recipe is definitely a go-to recipe, when looking for a simple but semi-healthy meal to whip up. Plus, it only takes one pot and the recipe yielded a ton of left overs, but again, I only feed a family of two. But my favorite thing has got to be that when eating this for left overs, you do not have to reheat it. I think this pasta taste great when eaten cold-- like many pasta salads. The combination of tomatoes with olives, Parmesan and a Cesar vinaigrette was delicious. And enough protein to hold you over. Though if you are vegetarian, you could easily just not include the chicken and I am sure it would be just as yummy! The hubby, who does not like olives-- ate two servings of this pasta. That's got to say something! And nope, he did not pick out the olives!


CHICKEN CESAR PASTA SALAD
Adapted from Fake Ginger

INGREDIENTS

1 pound of mini farfalle pasta
1 pint of mini grape tomatoes
1 regular (6oz) can of olives (pitted)
2 tbsp. olive oil
1 tbsp. minced garlic
1/2 bag (10.5oz) of Tyson's Grilled Chicken Strips
1/2 c. of grated Parmesan (+some for garnish)
1 c. of Cesar vinaigrette 
2 tsp. lemon juice
Green onion for garnish (optional)

DIRECTIONS

In a large pot of salted boiling water--cook pasta according to package directions. Drain excess water and run cold water through pasta to prevent sticking. Keep pasta in colander. Do not return to pot. 

While pasta is cooking: slice tomatoes and olives into thirds. Set aside.

After pasta is cooked but in colander, use pot to heat olive oil over medium-high heat. Once hot add minced garlic and saute until golden brown and fragrant. Then saute chicken, tomatoes and olives for 3-5 minutes until warm. Reduce heat to low and fold in pasta, until chicken, tomatoes, and olives are evenly distributed among pasta. Stir in Parmesan cheese, mixing until melted. Once melted, pour Cesar vinaigrette and lemon juice over pasta and toss pasta to incorporate. Garnish with a little green onion if desired.

Enjoy,
Chika 

19 August 2013

Brownie Pudding


Yesterday was a success. I got a lot of work done! :) I do, however, have the shortest attention span, I get very restless, very quickly! I know....let's save my diagnosis for later ;) Well, I take quite a few breaks, because when I don't, I get too antsy to be productive and become stir crazy. So-- taking breaks ends up being better for my productivity. Anywhoo, during those breaks, I like to spend my time scrolling through Pinterest- my place of inspiration and ideas. I mean what would my life be like without Pinterest?! I have been seeing these brownie pudding recipes flying all over the place. And I am always a sucker for brownies. I mean sometimes brownies and cookies are just as delicious uncooked as they are baked. My only exception have been pudding cookies-- which I will not go on and on about again :) I promise!

So I decided I would go ahead and try it. The ingredients are simple-- baking staples that I always have. Not only are these ingredients I already had laying around- but the batter was quick to whip up! A win-win! The baking reminded me of a flan--which also reminded me that I've never made a flan after starting this blog. I baked mine a little longer to create more of a mousse texture than a batter texture, because really if I wanted batter- I would have just saved myself the time and not baked it. Plus, I always like to avoid the chances of that ever so great salmonella poisoning. I mean have you ever got food poisoning?! Both the hubby and I have voted it one of the worst things to have ever.

As for this recipe! It is definitely AMAZING! I think I've said this before-- but usually I don't eat what I bake, except for cookies. But this has got to be an exception. If you could imagine a brownie mousse-batter love child-- this is it. A brownie that never gets dry or hard, and that absolutely melts in your mouth- with just thin layer of crunch to add texture. Delicious! I ate almost the entire thing myself! I could not help myself, it became my breakfast, lunch and dinner. You haven't heard of that new brownie diet ;) The hubby decided to eat his with the triple brownie ice cream I was telling you about. Cute right- triple brownie ice cream on top of a brownie pudding (mousse). Definitely will make this again, especially for my sister, I know she will love it!


BROWNIE  PUDDING
Adapted slightly from The Merry Gourmet

INGREDIENTS

Preheat Oven to 325F Degrees

2 sticks of butter
4 large eggs, room temperature
2 c. sugar
3/4 c. cocoa (Hershey's Special Dark)
1/2 c. all purpose flour
1 tsp. vanilla 

DIRECTIONS

Grease a 2 quart baking dish. If you do not know what constitutes a 2 quart baking dish (like me, you can refer this helpful chart). Set aside.

Melt butter and set aside to cool. Then, in the bowl of a stand mixer fitted with whisk attachment, beat eggs and sugar on medium high speed until a thick, pale yellow batter is reached (approximately 8-10 minutes). While whisking the eggs and sugar, sift and combine cocoa and flour. Make sure to sift, as you do not want lumps in your batter.

Once eggs and sugar appear thick and yellow, decrease the speed of the mixer to low and add vanilla extract followed by dry ingredients. Mix until just incorporated. The slowly pour in cooled, but melted butter-- again mixing until just combined.

Pour brownie batter into the prepared baking dish (I used a 8 inch square baking dish). Place this baking dish into a larger baking pan (I used a 9x13 casserole dish). Fill the larger pan with hot top water until half way full. Bake for 1 hour. If you want a batter like consistency bake for about 45-50 minutes. If you would like to have a mousse like consistency bake for 60 minutes. Allow to cool and serve at room temperature--maybe with some ice cream :)

Enjoy,
Chika

18 August 2013

Creamy Garlic Shells


Good news: I found a new show to watch! Though it is not any of  the shows my friends recommended. But I did not ignore them-- I just went with a show the hubby suggested first, a long time ago. The plot line seemed corny so I brushed it off, but in my desperate state of needing a new show to watch I succumbed to hubby pressure ;) The show is called Drop Dead Diva (on the Lifetime channel) and also Netflix's instant streaming (seasons 1-4; 5 is currently going). It's a pretty odd plot: pretty, skinny girl dies and is placed into a smart, fat girl, lawyer body; who ironically works at a firm that just hired the skinny girl's former boyfriend and love of her life. The show focuses on this odd love "triangle" (can you even call it that with two people and one ghost), all while trying different cases in court! I know, it sounds sooooo weird and dorky BUT it is pretty darn cute and funny. Though warning, I am a sucker for most things on the Lifetime channel....I know awful!

Bad news: Though I found a new show, I have not been able to watch much of it with the work I've been doing. The apartment is spotless, so I went back to my normal routine of having my life taken over by school work. Yay :/ And yesterday was no exception. I spent most of my Saturday, on campus, doing work! The hubby was really sweet and came with me, so I would not have to be by myself. So sweet-- but still boring. As for today--- more work. I have one report to write and I will do nothing but until it is complete! You probably assumed, that aftewards I could relax-- nope-- because there are about 2 papers and 6 reports that I also have to do :/ Hide me now! But, my goal is to get these done before school starts so I can have, for once in my life, a semi-relaxing semester. Is that possible? I am going to assume it is....

So before I hide myself away-- I wanted to share this pasta recipe I made the other day. I absolutely love pasta, rice and bread so much that I know those low/no-carb diets are almost impossible for me. I would rather do a lot of running than ever give up my carbs. Which is pretty much what I did for the wedding. Though,  I changed my diet, I still did not completely give up carbs. I am Sri Lankan-- curry and rice are like my staple. This recipe was pretty simple, straight forward and absolutely delicious. Ready in about 30 minutes. And it included some other flavor favorites: cheese and garlic! The combination was awesome- and the hubby loved it too. Though- I do suggest you read a few steps ahead so you have everything ready. Also, it is super duper creamy, but the creaminess was really hard to photograph, so it does not show it well-- but trust me that it was.


CREAMY GARLIC SHELLS
Adapted from Iowa Girl Eats


INGREDIENTS

8 oz. mini shell pasta
2 tbsp. olive oil (divided)
1/2 bag (10.5oz) of Tysons grilled chicken strips (1 1/2 chicken breasts)

FOR THE SAUCE
1 tbsp. butter
1 tbsp. garlic, minced
2 tbsp. flour
3/4 c. chicken broth (or vegetable broth)
3/4 c. heavy cream or milk
salt and pepper to taste 
3/4 c. grated Parmesan cheese
1-2 tsp. garlic powder (not garlic salt)
cilantro or parsley for garnish (dried seasoning)

DIRECTIONS

In a medium pot of salted boiling water-- cook pasta according to package directions. Drain excess water and run cold water through pasta to prevent sticking. Keep pasta in colander. Do not return to pot. 

While pasta is cooking, heat 1 tbsp. of olive oil in a large skillet over medium heat. Once hot, saute chicken breasts until warm (about 5-8 minutes). Remove from heat and set aside.

For the Sauce:
Before making the sauce, it is important to have all ingredients ready-- so as not to burn the garlic in the sauce. So get everything ready now.

In the pot used to cook the pasta, melt butter in remaining 1 tbsp. olive oil over medium heat. Once melted, add minced garlic and saute until slightly browned and fragrant. Whisk in flour and cook for 1 minutes, a thick consistency will be reached. Then slowly pour in chicken broth and heavy cream (milk), while simultaneously whisking-- until mixture is smooth. Season sauce with a little bit of salt and pepper. Using a wooden spoon or spatula, continue stirring sauce until it has slightly thickened, about 5 minutes.

Remove pot from heat and stir in cheese, 1 tsp. garlic powder and herb seasoning of choice until smooth. Once smooth and thickened, dump pasta back into pot, combining with sauce-- stirring until pasta is evenly coated. Toss in chicken. Taste sauce and adjust salt, pepper and garlic powder if needed. Garnish with additional herb seasoning.

Enjoy,
Chika

15 August 2013

Double Chocolate Chunk Pudding Cookies


Have you ever tried those death by chocolate ice creams? Not sure if you have a Kroger near you, but they have a Premium Ice Cream brand and one (technically two) of their selections is Moose Tracks. It is chocolate ice cream with fudge ribbons. And, those fudge ribbons are AMAZING! I am assuming they were so popular because they came out with a Moose Tracks Extreme ice cream with extra fudge ribbons. ::drool:: I thought I could never eat another ice cream, and although definitely not as chocolatey (if that is a word, and for the sake of this blog I think it should be)-- I found Kroger's triple brownie ice cream. Have you ever had vanilla ice cream mixed with Hershey's syrup? Weird and random right? Well- the ice cream taste like that stuffed with fudge ribbons and brownie chunks. Yes, you're right, another ice cream worth drooling over.

You know are probably wondering, why did I go on a long tangent about chocolate, other than to make you hungry? Well- goal achieved ;) Just kidding! I have been quite obvious about my love for pudding cookies and I since I made my Red Velvet Pudding Cookies, my cravings for more pudding cookies has not gone away. And then it hit me, for someone who loves pudding cookies and for someone who loves chocolate, so much so that I went on a spiel about chocolate ice cream and started a blog based on my obsession for chocolate-- that I was a complete dork for never making a simple chocolate loaded pudding cookie-- and nothing else?!? I mean what is wrong with me? I have made other double chocolate cookies: Double Chocolate Brownie Cookie and my Fluffy, Chocolate Fudge Cookies. But not a pudding cookie! Well, challenge accepted!

I made these cookies for some kiddos I was working with. Our program runs a six-week social skills group for children with Asperger's (though I guess with the new DSM, Autism Spectrum Disorder). I lead a teen group. Well, this week was our last week. I always talk with them about my love for baking, and so for our last meeting I wanted to make them some goodies. I decided to make my Reese's Pieces Cupcakes, Take 2 and these pudding cookies. I mean, I get to make my chocolate overloaded pudding cookies and make something super yummy at the same time. Both were a hit. All the cupcakes and cookies were eaten up by the kiddos and their parents. And the extra- I gave to the hubby to take to the dog park for our friends to enjoy :) So, now it is your turn to enjoy the yumminess that is these cookies!


DOUBLE CHOCOLATE CHUNK PUDDING COOKIES

INGREDIENTS

Preheat Oven to 350F Degrees

2 c. of flour
1/3 c. cocoa powder (Hershey's Special Dark)
3.4-3.56 oz. chocolate pudding mix (dry)
2 tsp. baking soda
1 1/2 stick of butter, softened
3/4 c. packed brown sugar
1/4 c. sugar
2 eggs
1 tsp. vanilla
1 (11.5oz) package of chocolate chunks 

DIRECTIONS

In a medium bowl, whisk together flour, cocoa powder, chocolate pudding mix and baking soda. Set aside.

In the bowl of a stand mixer fitted with paddle attachment, cream together butter and sugars until fluffy, approximately 5-8 minutes. Next, mix in eggs, one at a time, followed by the vanilla. Then, add dry ingredients to wet ingredients, slowly mixing until just incorporated. Finally, stir in 1 cup of chocolate chunks.

Line baking sheet with a baking mat, aluminum foil, parchment paper, or wax paper. Using a cookie scoop (or large spoon)- scoop out 1 1/12 inch cookie dough balls onto sheet (roll between between palms of your hands for a nice round shape). Space the cookies 2 inches apart on the lined baking sheet. Press 1-3 chocolate chunks into the top of each cookie while also pressing down on each cookie to flatten, these cookies do not spread at all- so make sure to press down. Bake 8-10 minutes and let cool before serving (but not too much, because ooey-gooey chocolate is delicious ;).

Enjoy,
Chika

Blog design by Bella Lulu Ink