.widget.Profile .widget-content>a img.profile-img { min-width: 80px!important; min-height: 80px!important; max-width: 80px; border-radius: 40px; } .widget.Profile .widget-content>a img.profile-img { float: center; } .widget.Profile { text-align: center; float: center; margin: auto; }


31 August 2012

Sushi: California Roll


Happy Friday! Thank goodness we are at the weekend!!!! I am ready to spend some major hours napping and making up for the week! Today brought a rainy and rare, non-eventful day for me. I had more time for some cooking (though I was tempted to bake and feed the hubster cookies for dinner- do you think he would mind? ;) ). Well- with the extra time I had to cook- I decided that I would make sushi. Unfortunately, the hubster is not a big fan of seafood (ironic, given that he is from Louisiana). I on the other hand, am a HUGE fan of sushi- so to compromise (because that is what people tell me makes a successful marriage)- decided I would make a "semi" seafood sushi- ie: the California Roll. I mean who does not love a basic, california roll.

Luckily- for my birthday this year, the hubster bought me the sushi magic kit! It's a tool that helps with the rolling of sushi. It's actually a pretty niffty tool. I also have a bamboo mat but I think I'll stick to using the sushi magic for now. It also has wonderful tutorial videos on youtube that you can watch to help make sushi- I found the videos quite helpful. It also comes with a sashimi making tool, but I did not make shashimi (this time). However, until now, I have not used my sushi magic (and my birthday was in January)- so it had been awhile. Well I whipped out the sushi magic and was ready to make some sushi- I was excited! Suprinsingly, it was way easier than I thought and not even close to being messy. I was blown away! Today marks an exciting day for me- the day I learned to make sushi. I spend tons of money a year making the hubster take me to sushi restaurants, but now I am happy to say that I have an inkingly that I can start making sushi myself....so stay tuned....

I made two versions: regular (with nori on the outside) and inside-out (with rice on the outside).
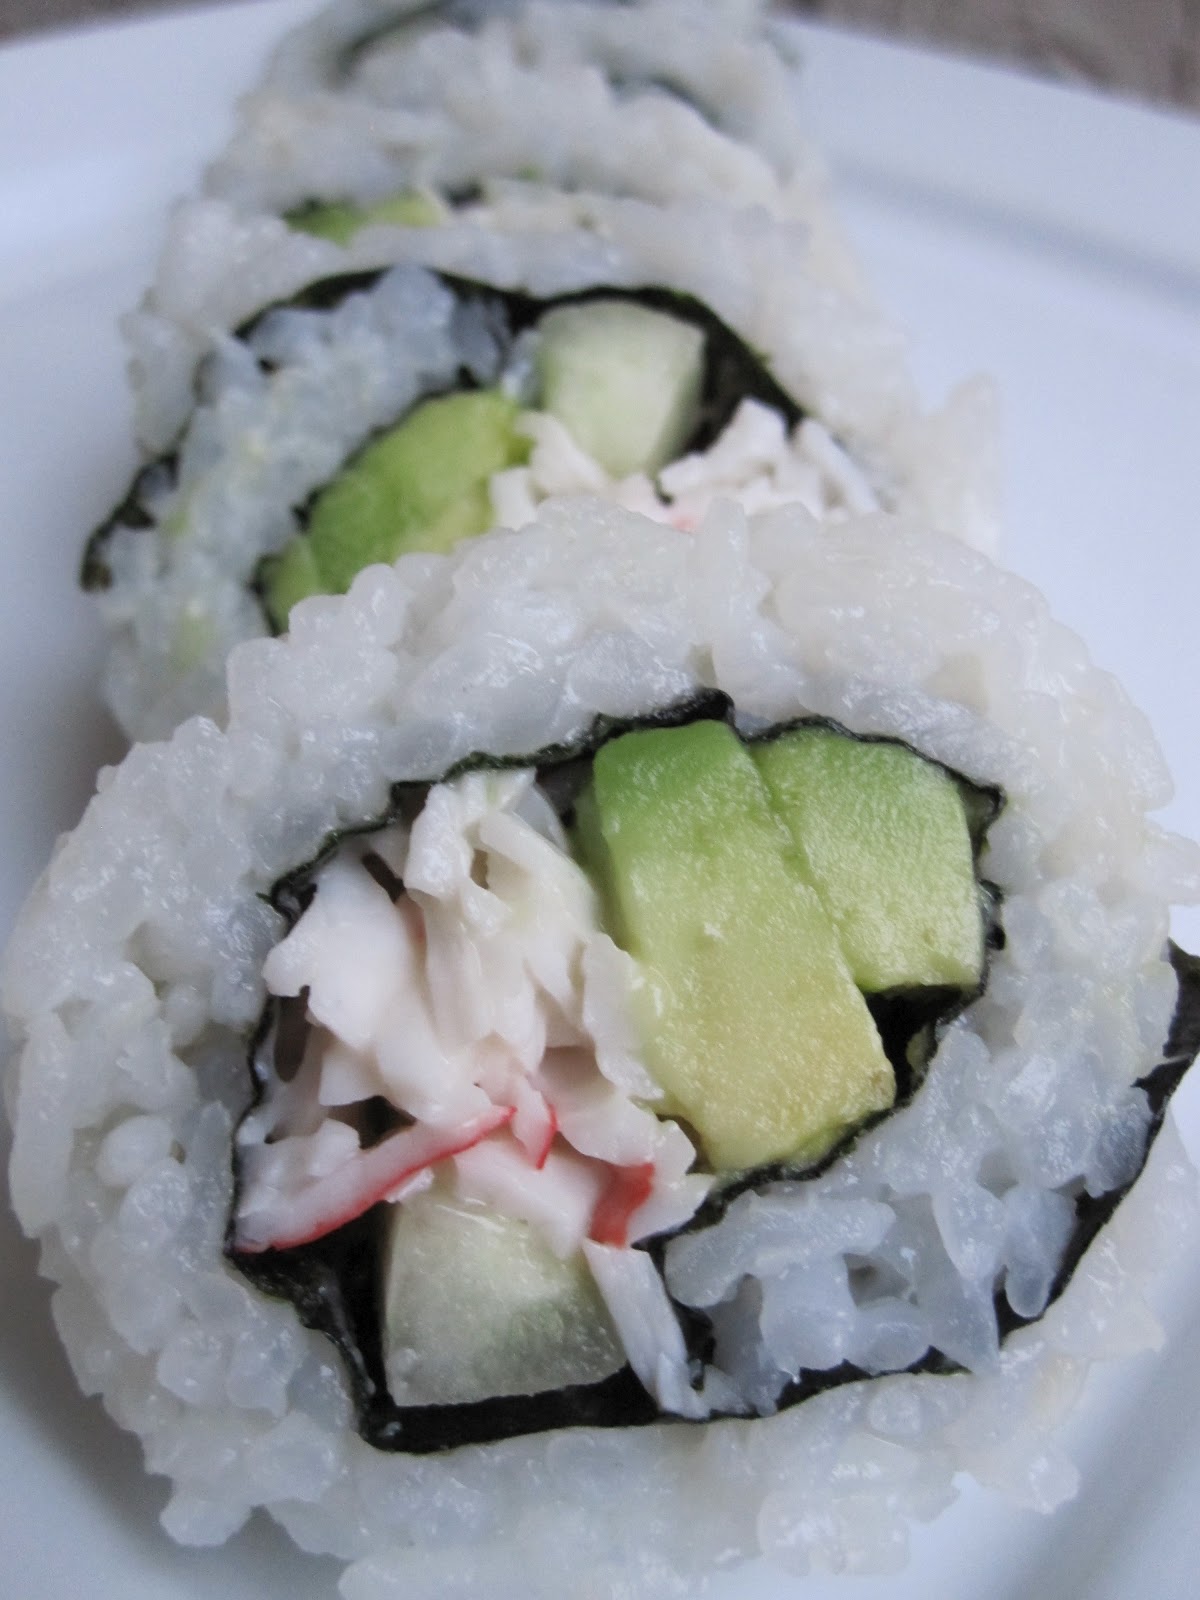


CALIFORNIA ROLL
A For the Love of Dessert Original Attempt

INGREDIENTS

FOR THE RICE
2 c. uncooked sushi rice
3 c. of water
1/2 c. of rice vinegar
1 tbsp. olive oil
1/4 c. sugar
1 tsp. salt

FILLING
1 c. of imitation crab meat (shredded)
1/2 c. of mayonaise
Nori Sheets
1 cucumber, cut into thin 5 inch strips
Avocado pitted, peeled, and sliced the long way
Sesame seeds for garnish

DIRECTIONS

Using a rice cooker, cook the rice with the specified amount of water. Once cooked, do not open the rice cooker right away, allow it to sit for 5 minutes. Then open the rice cooker and let rice cool completely (set aside). On the stovetop- combine rice vinegar, olive oil, sugar and salt- until completely dissolve, allow to cool completely. Once cooled, mix in with rice. For the filling, mix the imitation crab meat with mayonaise.

To assemble to the sushi, place the nori sheet on bamboo mat, wet your fingers and push down rice evenly over the nori (the water will prevent the rice from sticking). Place the immitation crab meat mixture in the center, making a 1/2 inch strip (no thicker as the sushi will not close). On the end closest to you, place the cucumber strip- placing the cucumber here, will prevent the imitation crab meat from shifting. Then on the other side of the imitation crab meat strip, place the avocado. Roll sushi closed. The garnish with sesame seeds. To cut into pieces, wet the knife (for the same reasons you want to wet your fingers)- this will allow the knife to cut through nicely.

Enjoy,
Chika

30 August 2012

Steamed Pork Buns (Bao)


Its only been two days since my last post and I can tell you that this has been an absolutely exhausting week! But I can always find solice in my baking, and now, cooking. I always mention the hubster but what I have not told you about him, is that he constantly likes to try new and different cuisines and recipes. He loves to experiment with food and so most of the easy 1,2, 3 recipes just do not work for him. So I'm always on the hunt for interesting recipes that are not too complicated to make, as I only come home from school at about 6-7pm and so hours of cooking time are just not feasible.

Well 3 years ago, when the hubster and I were only dating for about a year, he came with me to Chicago to celebrate my 24th birthday. I asked my sister, my closest cousin and the hubster to celebrate with me via a destination birthday- hence Chicago. While there, we stopped at a mall where they were selling Steamed Pork Buns (Bao). Now, to the hubster this was a new food. For me, this was a flashback to childhood (as my sister can tell you). Growing up in Hawaii, this was a common and popular food that we called mana pua (I cannot garuntee that I am spelling that right)- so to find this food again was an awesome memory of childhood.

As I searched for recipes, I stumbled upon a recipe for Steamed Pork Buns (Bao) and just new that the hubster would love this- so I had to try. And let me tell you- boy was this a LEARNING EXPERIENCE! The first couple I made were horrible, the next few were "eh", and finally I go the swing of things (not that the last few were amazing)- but I have to say that I am pretty proud of the turn out (given that my cooking skills are still "growing").


STEAMED PORK BUNS (CHINESE BAO)
Adapted from Use Real Butter

INGREDIENTS

FOR THE DOUGH
1 3/4c. hot water
1/4 c. sugar
1 tbsp. yeast
6 c. flour
1 tbsp. baking powder
2 tbsp. shortening

FOR THE FILLING
1/2 c. chicken broth
4 tbsp. oyster sauce
2 tbsp. ketchup
5 tsps granulated sugar
4 tsps. cornstarch
2 tbsp. soy sauce
1/2 tsp. salt
3 tbsp. olive oil
1 package of ground pork(1lb)
1/2 c. green onion (diced)
Mushrooms finely diced

DIRECTIONS

In a medium bowl, dissolve sugar in warm water and add the yeast- whisk together. Let the yest stand for about 10 minutes or until it becomes frothy to the top. In a separate bowl, sift flour and baking soda. Then mix in shortening. Slowly add yest mixture and mix well (I used a dough hook attachment with my kitchenaid mixer). Knead dough until smooth and place in large bowl. Cover tightly with plastic wrap and let dough rise in warm place for about 2 hours, until it triples in size. When dough has risen, "punch" the dough a few times to deflate it. Roll lengthwise and cut 24 equal pieces.

For the mixture mix together chicken broth, oyster sauce, ketchup, sugar, corn starch, soy sauce, salt, olive oil, and green onion. Set aside. Cook ground turkey unitl (almost cooked) then add in mushroom and onions and sautee for a few minutes. Then add in sauce mixture and cook on high heat for about 2 minutes, then cook on low heat for about 5 minutes until sauce thickens. Place in refridgerator until completely cooled.

To assemble the pork buns, roll each piece of cut dough into very thin cirlces (yes, thin- the dough will thicken when steaming). Cup the dough in your hand and place a spoonful of mixture in the middle, then fold closed. Pleat the edges together, with the intent of gathering the edges to form a sort of bowl from the dough (use your thumb or spoon to push the filling down). Use Real Butter has a very nice tutorial on how to fold it "properly"- and although I tried very hard, I could not seem to get it right- so for folding, I refer to Use Real Butter. Let stand for 10 minutes then place in steamer (at least two inches apart from one another) and steam for 10-15 minutes until dough is nice and fluffy.

Enjoy,
Chika

28 August 2012

Stuffed Portobello Mushrooms


Fall Semester has officially begun. And with that beginning- comes a very, very packed schedule. In addition to my normal responsibilities- I have began teaching. I am so very excited about this- I am teaching Psychology of Adolescence. Hopefully my class will be as passionate about this topic as I am or if not at least find it midly interesting ;) Well, all this has led to an extrmeley tired me.

However, now that I have a hubster to feed ;) coming home has proved a challenge to my energy level, but an interesting and fun challenge nonetheless. I have less time for baking since my attention is now diverted. This month I've done my very fist non-dessert-recipe (avocado mac and cheese) and it was well received. I have a strong desire to keep my blog constantly updated, so that I always having something new to share. But keeping my blog updated, can be a litte difficult, so I've decided to begin sharing more of my non-dessert recipes (or shall I call them trial-and-errors). Do not confuse this as a move away from my passion- I will always love baking desserts the most :) In addition, in my path to becoming a self-taught baker, I've added the goal of enhancing my culinary skills as I learn to cook for two. So for now For the Love of Dessert will be sharing some of its focus on non-desserts.


STUFFED PORTOBELLO MUSHROOMS
A For the Love of Dessert Original

INGREDIENTS

Preheat Oven to 350F Degrees

1 c. yellow rice
7 tbsp butter
5 thinly sliced chicken cutlets
1 tomato (diced)
1/2 onion diced
1 Tbsp garlic
5 portobello mushrooms
Oregano and Cilantro seasoning

DIRECTIONS

Cook the rice (I use a rice cooker). When the riced is cooked- add 2 tbsp of butter and mix in. Set aside. In one pan, add 1/2 inch of olive oil and cook chicken cutlets (make sure to get a nice golden brown crust on the outside). Once cooked, cut into strips. In a separate pan, sautee onions and garlic until slightly brown, then add tomato. Mix in yellow rice and chicken strips (keep a few chicken strips on the side for garnish).

To prepare the portobello mushrooms- first remove the stem by pulling in the opposite direction in which it's learning (it should snap right off). If needed, take a knife and cut it off at the base. Remove the gills by cradling the portobello in one hand with the gills facing up, then use a small spoon to scrape the gills off, moving in a circular path (the gills should come out very easily, and you do not need to use a lot of pressure). Then using a damp paper towel, wipe the cap of the mushroom to remove any residual dirt. Using a brush- coat the mushroom caps with olive oil. In the cup of the mushroom, place one tbsp. of butter.

Place one scoop of rice mixture (with onion, garlic, tomato and chicken mixed in) in each mushroom. Bake in oven for 25-30 minutes. I garnished my stuffed portobello mushrooms with chicken strips, sundried tomatoes, and a dash or orgeano and cilantro seasoning. I suggest (even though I did not) some shredded cheese on top as well :)

Enjoy,
Chika

24 August 2012

Caramel Cake


So today marks another birtday and yet another chance to practice my cake baking skills. Today was Angie's birthday- she is both a friend and our clinic administrator - so Happy Birthday to her :) Well a little birdie reminded me that today was her birthday and I knew I wanted to make her a cake (and if it failed- buy her a cake ;) ). At first I was a bit unsure of what to make. The first thought was chocolate but I realized, tragically, that not everyone has the same love and appreciation for chocolate like I do :) I wanted to find a more "neutral cake" that everyone could enjoy especially Angie and her two sons. So I searched Pinterest, both my Cake board and just recipes shared but I could not find anything that stood out to me. Luckily I randomly remembered an old co-worker once made caramel pie and remembering that it was a big hit. From there I thought- was there such a thing as caramel cake? Well there is! It was decided...I was going to attempt to make a caramel cake from scratch. It was another amazing and super messy learning experience, but it came out better than the Lemon Cake I made for the hubster so that was progres :)

Now on to more important things: baking facts and tidbits! I've mentioned before my curiosity between cake flour and all purpose flour but I ran into another conundrum- what then is self rising flour? Well self-rising flour is all purpose flour with both salt and baking powder incorporated. So if your recipe calls for all self-rising flour and you do not have it- do not fret and do not go the grocery store- simply add the salt and baking powder your self (1/4 tsp. salt per cup and 1.5 tsp baking powder per cup). Another fun tidbit learned: when baking recipes ask for you to cream the butter and sugar- cream the butter first on low speed for 2-3 mintues, if you are patient you will notice it become nice and fluffy. Then add the sugar and cream for 6-8 minutes (8 minutes is desirable)- this mixture will become amazingly light and fluffy and will grow triple in size (you will wonder how did all that come from butter and sugar). This will really help with the lightness that is desired in cake.


I used skewers in my cake to prevent shifting


CARAMEL CAKE
INGREDIENTS
Preheat Oven to 350F degrees

FOR THE CAKE
2 sticks butter, at room temperature
2 c granulated sugar
4 eggs
3 c cake flour
3/4 tsp salt
4.5 tsp baking powder
1 c milk
1 tsp pure vanilla extract

CARAMEL FILLING AND BUTTERCREAM
2 stick butter
2 c packed dark brown sugar
1/2 c heavy cream, or more if needed
4 c. confectioners' sugar (add more if consistency is too liquidy)
1 tsp pure vanilla extract

DIRECTIONS

Cream butter until fluffy. Add granulated sugar and continue to cream well for 6-8 minutes. Add eggs, one at a time, beating well after each addition. Add dry mixture (cake flour, salt and baking powder) and milk, alternately to creamed mixture, beginning and ending wtih flour. Add vanilla and continue to beat until just mixed. Divide batter equally among pans (I did two- for two layers). Level batter in each pan by tapping on counter top- this will also get rid of air bubbles. Bake 30-35 minutes until golden brown. The original recipe said 25 minutes but my cakes took much longer to bake.

For filling and buttercream- combine butter, brown sugar and cream into a saucement and stir until well incorporated and till you have reached a nice thick consistency- about 10-15 mintues. Mix with powdered sugar. Do not add all the caramel sauce at once- as this can make your frosting too liquidy. I suggest adding half of it first then mixing with powdered sugar and slowly adding more- until you reach the consistency and amount of frosting/filling needed.

Enjoy,
Chika


22 August 2012

Cake Batter Cookies


As promised...my second post resulting from yesterday's cooking/baking time. I started this blog because of my exterme love for cupcakes and this desire to bake them. But because of this blog, I am trying to bake many different things so that I learn. What I learned was that I have an odd love for cookies that is almost certainly rivaling my love for cupcakes. Who woulda thunk ;) either way I do not mind. Though I have to say that my sweet husband brought home cupcakes for me to enjoy as a celebration for passing my preliminary exams and proposing my dissertation. I only had one so far- the cookies n' cream one but today I am going to have the double chocolate one. Check out the review of Cupcakes Couture in College Station under my Cupcakery Reviews page.

One intention that I had made was that with each post I would attempt to share something I learned. Well I did not include one in my last post because I had some exciting personal news to share. Fun fact for this post (which I actually tried in my recipe) is about corn starch. Traditionally corn starch in large amounts is used to thicken recipes (ie. sauce, shortbread cookies); However when used in small amounts corn starch can help keep cookies soft and chewy! My new favorite fact. I love soft and chewy cookies, in fact I hate non-soft and chewy cookies (Im not sure how people manage to eat them). So lesson learned: use corn starch :)


CAKE BATTER COOKIES

INGREDIENTS

Preheat Oven to 350F degrees

1 (18.25 oz.) box yellow cake mix
1 tsp. baking powder
1 tbsp. corn starch
2 eggs
1/2 cup vegetable oil
1 cup semisweet chocolate chips

DIRECTIONS

In a medium bowl, stir together cake mix, baking powder, and corn starch. Add eggs and oil- mix well until blended. Mix in chocolate chips. Drop by rounded spoonfuls onto cookie sheets. Bake for 10 minutes in the preheated oven. Allow cookies to cool on baking sheets for 5 minutes before transferring to a wire rack to cool completely. 
 
Enjoy,
Chika

21 August 2012

Avocado Mac and Cheese


Today is a special day and will mark two baking events (one of which will be posted tomorrow since I take all my pictures in the daytime and I only plan on starting to make my next "creation" after this post). Anywhoo...why a special day you may ask? Well let me tell you. Within our program we must propose our dissertation topic to our committee as well as pass oral preliminary exams which occur during the same meeting. Well today was that day for me. I had my dissertation proposal meeting and preliminary exams this morning- and I passed :) What a feeling of major stress being lifted, joy, exhauation and awesomeness I felt. But by "passing this" I can now officially call myself a doctoral candidate!!!! Super duper exciting stuff for me- it really is one step closer to obtaining my PhD and I could not be more excited.

Ok! Brace yourselves but I am now going to post about a non-dessert! OMG! I did not think I would do this, but then I realized, that since the whole point of my blog was to expand my repetoire beyond psycholoygy- my next thought was why not? Married life has brought new and exciting changes/challenges for me. One being cooking for two and the other making the hubster lunch and dinner (and soon hopefully homemade breakfasts...right now he does cereal). Since I was preparing for my proposal meeting, I was MIA in the kitchen but now Im back :) I stumbled upon this cool recipe on Pinterest (where else?)- for avocado mac and cheese. I love, love, love avocado and I love mac and cheese- so I just had to try it and I had to share. Hopefully you enjoy.


AVACADO MAC AND CHEESE

INGREDIENTS

10 ounces dry elbow macaroni
2 cloves garlic, minced
2 avocados, peeled and pitted
2 tablespoons fresh lime juice
1/3 c chopped fresh cilantro
Salt and pepper, to taste
2 tbsp butter
2 tbsp all-purpose flour
1 c milk
2 c shredded cheese (pepper jack is recommended)
Salt and pepper, to taste
DIRECTIONS

Bring water to a boil in a large pot. Salt the water and add in macaroni. Stir and cook until Al Dente, about 8-10 minutes. Drain and set aside. While the pasta is cooking, make the avocado sauce by placing the garlic, avocados, lime juice, cilantro, salt and pepper into a food processor or blender. Process until smooth and creamy. Set aside. To make the cheese sauce, place butter in a small saucepan and heat over medium heat. When butter is melted, whisk in flour to create a paste. Whisk in milk until smooth. Stir with a wooden spoon until the sauce starts to thicken. Add in Pepper Jack cheese and stir until cheese is melted and sauce is creamy. Place macaroni in a large bowl. Pour the avocado sauce over the macaroni and stir until well coated. Add the cheese sauce and stir until macaroni is coated and creamy. Season with salt and pepper, to taste. Serve warm.

Note-the lime juice keeps the avocado from browning. The mac and cheese is best eaten the first day, but it is still good the second day. The pasta may turn slightly brown.

Enjoy,
Chika

Cupcakes Couture Review

Location: College Station, Texas
Price: $3.25/cupcake
Rating: 3 out of 5 stars

I completed my preliminary exams and proposed my dissertation- which officially made me a doctoral candidate :) Yes, very, very exciting! The hubby, of course knowing me well, brought me home some cupcakes so that I we could celebrate! I need to go on a quick tangent: when I first moved to College Station, one of the first things I noticed was that there were no cupcakeries in town (that I knew of). Although sad, this was quite exciting for me-- because I really thought...hmmm..maybe I could open up a cupcakery, especially since there appears to be a "need" here- because really, who does not need cupcakes?! 


Sadly, the fall after my first year here- I found out about a cupcakery that had recently opened: Cupcakes Couture. Well--flash forward to the summer when I proposed my dissertation-- the hubby remembered about this cupcakery and thought it was about time we tried it. Now you are probably wondering why in the world had I not tried it earlier? Well- truthfully I was just a bitter bug and dork--and felt like they "stole" my idea of opening up a cupcakery in College Station. And so I went on a cupcake strike ;) [Do not worry- it did not last long]


Cupcake Couture is located on a some-what major street in College Station, but is a small boutique that is easy to miss. This is not a con- I LOVE places like this. They have a cute Tiffany's Teal Color Theme and no specific logo. They have a variety of flavors but only select flavors are available each day- quite typical of many cupcakeries. Their cupcakes are beautifully decorated, not sloppy in the least bit and I really enjoy their cupcake to frosting ratio. That's about it for the good...


I am all for rotating flavors, but what annoys me is that usually these cupcakeries have a website which tells you what they serve on each day. Cupcake Couture does not have a website and so it is like a crap-shoot on what flavors they are offering each day and really what flavors they offer in general. And I am not a regular to know their menu that well. If you have a rotating menu-- that is fine-- but have a website where people can look it up! Which reminds me- since they have no "menu" I have no idea if any of their cupcakes are filled :(


We tried: Red Velvet, Chocolate, Caramel and Cookies n' Cream (Oreo). 

As for the cupakes- they are small, flat and lack moisture :/ To be honest, just by looking at them, the cupcakes look a bit on the dry side. I talked to someone about Cupcakes Couture and they said the same thing! I should clarify on what we both thought- if you buy the cupcakes and eat them the same day- they are not bad and seem "moist-enough" (which is not the best but not awful) but if you wait to eat them, even just a day-- its like all the moisture vanishes. And to a certain extent this is normal in cupcakes, but theirs is just so dry and I think its because they make their cupcakes just "moist-enough" in the first place. 


My bottom line: this is a "eh" cupcakery and if I have a really strong craving and this was the only place open- I would get cupcakes from here. And they are pretty in pictures ;) BUT if I had the time and although not tons better- I would rather go to BCS Chocolate Gallery and then Cake Junkie (any day) before I go to Cupcakes Couture. But I would rather go to Cupcakes Couture than Crush Cupcakery anytime! If you are from College Station and enjoy Cupcakes Couture-- we have go to show you a real cupcakery :) 

And since I basically described Cupcakes Couture as a almost but not close last resort in the area--a slight below 3rd place--and edible- I felt a good description would be "slightly below average"-- hence the 2.75 3 star rating. Why that specific- I really compared all the BCS cupcakeries against each other and used these ratings as almost a ranking system (if that made sense :) and that's how I got 2.75 3.

Update: I recently tried their peanut butter chocolate cupcake and I really enjoyed it! And so...I am going to keep my mind open about Cupcakes Couture and will try more-for now I bumped up their score to 3 as I prefer their cupcakes just as much as Cake Junkie (though with Cake Junkie you get way more cupcake for the $)


Updated: Cupcakes Couture now sells cake balls. I went and purchased a chocolate, red velvet, snickerdoodle, and vanilla cake balls for a potluck dinner with Justin and Luke. They were beyond DISGUSTING! DO NOT TRY THEIR CAKE BALLS! They were grainy and did not taste how thye were supposed to. 

14 August 2012

Double Chocolate Brownie Cookies


Im not one for mentioning sad things or even discussing the news, but this time I must. Yesterday, their was a tragic shooting in College Station, Texas near Texas A&M University. A criminal opened automatic fire on police and innocent by-standers and several people were both injured and murdered. This breaks my heart! These are PEOPLE, who are fathers, brothers, husbands, and friends. And to those people, I am so sorry for your loss. And to the many family and friends that called, messaged, texted to check on Beau and I- thank you for your care and I feel so very loved.

And not to move onto news as if that did not matter, but chocolate always makes me feel better during hard times. Yesterday I went to lunch at Potbelly's with one my friends, his advisor, and my advisor. My advisor thankfully has the same love for chocolate as I do and so she decided we needed to try the Chocolate Brownie Cookie [plug for Potbelly's: eat this cookie!]- not that I needed any convincing. So I came home, after finding out about the shooting, and decided- I need chocoalte and I need chocolate cookies, as similar to those brownie cookies as I could get. So I scoped Pinterest, but did not find a good recipe [note to others: read the comments that people leave on blog recipes, they leave really good feedback about the recipe that the blogger did not]. I then stumbled on this awesome recipe that looked yummy and so I knew where I was going.

Before I begin that, I noticed that some people enjoyed the facts that I left about shortening vs. butter and cake flour vs. all purpose flour. So, each post, I am going to try my best to add some baking facts. (1) always mix dry ingredients together first and then add the mixture to wet: ingredients this will help with the consistency of the baked goods and (2) anyone ever wonder what is the difference between baking powder and baking soda? I know I do but never took the time to look it up. But now I did: both are rising agents that are added to bake goods to help them- well- "rise"- but the reaction brought by baking soda starts right away so you need to bake soon once added! Baking powder, only really starts the "rising" when placed in the oven :) So now you learned two things!


mothwatering...

DOUBLE CHOCOLATE BROWNIE COOKIES
Adapted from: Simply Scratch

INGREDIENTS

Preheat Oven to 350F degrees

1-1/4 c Hershey's special dark cocoa powder
1-1/2 c all purpose flour
1 tsp baking soda
1 tsp baking powder1 c unsalted butter, softened
1 c white sugar
3/4 c dark brown sugar
2 eggs
2 tsp. vanilla 
2 c. chocolate chips

DIRECTIONS

In a medium bowl; whisk together the flour, cocoa powder, baking powder and soda. In a large bowl cream together the butter and both of the sugars until light and creamy. Add in one egg at a time until well blended followed by 2 tsp. vanilla. Gradually add in the cocoa/flour mixture. Gently mix in the two cups of chocolate chips and spoon out onto prepared pans. Bake in your preheated oven for 8-10 minutes. Cookies will be puffed up a bit but will settle as they cool. Allow the cookies to cool on the pan for 5 minutes before transferring to a cooling rack.

Oh- usually I do not eat what I bake and I share...this time..these are all mine. Thats how utterly wonderful they are!

Enjoy,
Chika

09 August 2012

Samoas Cupcakes


Through our program, I am taking part as a student therapist, conducting a six week parent management group for parents with children who are diagnosed with Asperger's. This is the first time in a long while that our program has done a parent group and since it's been so long- I literally had to create the modules being provided to the parents- creating lessons, worksheets, handout, etc. It was a lot of work but I loved it! I really enjoy working with parents and the group was full of some wonderful people. Well today was the last day of the six week group- and so I wanted to make them cupcakes as my "farewell."

I searched through my Pinterest and found some awesome recipes for the Girl Scouts Samoas Cookie- turned into a cupacke. I thought they looked wonerful and had to try it. Also, it has a really interesting recipe for caramel buttercream. I have not really gotten to make different types of buttercream other than vanilla and chocolate- though recently for Beau's Lemon Birthdy Cake- I got to try to make Lemon Buttercream.

It always fun trying new things and especially from scratch. Sadly as I started baking I made one fatal error :( It was so tragic. I did not put enough milk. I only used a half of a cup instead of a cup and a half. I just read it wrong and realized my mistake too late! The cupcakes were already baking. But fun fact: milk in cupcakes add to the "fluffiness (aka the round top) of the cupcakes as well as the moistness. The result: my cupcakes were on the dry side! My baker's worst nightmare :/  I was soooooo bummed. But it was too late to start again. [To my blog readers: do not forget to add the milk!] So I took them to my parents group and forewarned them about the tad bit dryness as well as the other student therapists. Luckily, everyone seemed to enjoy it, including the hubster, though they did slightly notice the lack of moisture. But hopefully they forgive me. The hubster really loved the caramel buttercream. So try it out- I mean who does not love Somoas?!


The Texas heat started re-melting the chocolate. That is how hot
it was! Oh Texas and your summers.


SAMOAS CUPCAKES

INGREDIENTS

Preheat Oven to 350F degrees

FOR THE CUPCAKES:
2 cups flour
3/4 cup natural cocoa powder
12 tablespoons (1 1/2 sticks) butter, room temperature
1 3/4 cups sugar
1/2 teaspoon salt
1 1/2 teaspoon baking soda
2 teaspoons vanilla extract
1/2 teaspoon coconut extract
4 large eggs, room temperature
1 1/2 cups milk

FOR THE CARAMEL BUTTERCREAM:
16 tablespoons (2 sticks) unsalted butter
1/2 teaspoon salt
2 cups packed brown sugar
1/2 cup milk
2 teaspoons vanilla extract
5 cups powdered sugar
1 cup sweetened shredded coconut
1/4 chocolate candymelts

DIRECTIONS:

In a medium bowl, whisk together the flour and cocoa powder. In another bowl cream together the butter, sugar, salt, baking soda, vanilla, and coconut extract until fluffy and light, at least 3-4 minutes. Add eggs, one at a time, beating until each is incorporated, scraping down sides of bowl as needed. With the mixer on low speed add in the dry ingredients in three batches, alternating with the milk beating just until combined. Fill the cupcake papers 1/2 full, making sure that the batter is divided evenly. Bake, rotating tins halfway through, until a toothpick inserted in centers comes out clean, 20-22 minutes.

To toast the coconut, spread the coconut onto a rimmed sheet pan. Toast in a 350°F oven, stirring frequently, until the coconut is an even brown color, about 10 minutes.

To make the frosting, melt the butter in a heavy-bottomed saucepan over medium heat. Stir in the salt and brown sugar and heat the mixture to boiling, stirring constantly. Cook over low heat for 2 minutes, until the sugar is dissolved. Stir in the milk and return to a boil, stirring constantly. Remove the pan from the heat and stir in vanilla. Cool to lukewarm, about 30-40 minutes, stirring occasionally.Once the caramel frosting mixture is lukewarm, transfer to the bowl of a stand mixer fitted with the paddle attachment. Add the powdered sugar and beat on medium-high speed until light and fluffy, about 3-4 minutes. Adjust consistency with a little more milk or powdered sugar, if necessary.

Heat candymelts in microwave for about 30 seconds or until drizzling consistency. Transfer the frosting to a pastry bag fitted with a decorative tip. Pipe a spiral of frosting, beginning at the outer edge and working inward. Drizzle the frosted cupcakes with melted chocolate and garnish with toasted coconut.

Enjoy and sorry for the missed milk!
Chika

05 August 2012

Birthday Lemon Cake


The name gives it away- this post is a birthday post. Today, I get to wish my wonderful husband a Happy 27th Birthday! We went to see a movie and then dined at Veritas Restaurant. It was such a nice day and I always love celebrating the hubster's birthday.


I take birthday's quite seriously, whereas the hubster finds it no big deal. And although we had a dessert at dinner, the hubster requested a lemon birthday cake. So- I searched, to fine the most lemonly cake possible. Most recipes I found would have a vanilla cake with lemon curd and/or lemon buttercream. But I wanted lemon cake, lemon buttercream and lemon curd filling. I had to mix and match different recipes I found online but the final product was a true lemon cake, through and through.

Another fun fact about this cake: it was my first ever all homemade cake (also the first time I used cake flour). Sadly it was not chocolate but the memory will be fond :) It was definitely a learning experience- a messy, hard, difficult, fun and crazy learning experience. Definitely felt overwhelmed at times and I was not ecstatic with the final product but in all fairness, it was my first time. Decorating this cake was also new: I attempted to make a "baseket weave" pattern. What I learned: I am clearly not a cake expert and cupcakes are definitely more of my "forte." But it was overall really fun and so I look forward to learning how to make cakes with greater skill in the future. So hopefully I will get more chances. And more chances to make chocolate cake.

I can give no comments as to how good it taste. I know that it definitely taste lemonly from the bits I taste tested and from the smell of my kitchen ;) but that is all I know. But I am, by far, not a lemon fan at all. So I did not try it. But the hubster said it was delicious. He said the cake had a great texture and was subtle in taste, which really went well the the lemon curd and lemon buttercream. Im not sure how much that adds to the recipe, considering Im convinced he says he likes everything I make.


Close up of the basket weave


Basket Weave
2 layers of lemon buttercream and 2 layers of lemon curd
BIRTHDAY LEMON CAKE

INGREDIENTS

Preheat Oven to 325F degrees

FOR THE CAKE
2 3/4 c. cake flour
3 tsp. baking soda
1/4 tsp. salt
1 c. unsalted butter
2 c. sugar
4 eggs
2 tsp. vanilla
1/2 c. freshly squeezed lemon juice
3/4 c. buttermilk

FOR THE LEMON CURD
6 lightly beaten egg yolks
1 1/2 c. sugar
1/2 c. lemon juice
1 stick of butter (cut up into tblsp.)

FOR THE BUTTERCREAM
1 c. butter softened
7 c. powdered sugar
1 lemon (juiced)
1 tsp. vanilla
pinch of salt
DIRECTIONS

For the cake- cream together butter, sugar, eggs and vanilla. In a separate bowl mix together dry ingredient and in another bowl mix together milk and lemon juice. Add dry mixture and milk/lemon juice mixture alternately into butter/sugar/egg/vanilla mixture. Cream together thoroughly. Place in 2, 8inch pans and cook for 35-40 minutes. Once baked, let cool completely.

For lemon curd: on medium heat mix lemon juice and sugar until sugar is dissolved. Then slowly add in egg yolks and wisk well to prevent egg yolks from cooking. Stir constantly for 10 minutes, until mixture thickens and coats the back of a wooden spoon. Remove from heat and add butter- 1 tbsp. at a time. Place in refridgerator until cooled.

For buttercream: cream together butter, lemon juice, and vanilla. Then slowly add in powdered sugar. Add more powdered sugar if consistency needs to be thicker and add more lemon juice for consistency to be thinner. 

Assembly: cut each round cake in half. Use buttercream for first sanwich, the lemon curd, the buttercream and finally top with lemon curd. When filling with lemon curd for both sandwich layer and top layer, use buttercream to make an outline of the cake, so lemon curd will not spill out. Decorate cake with butter cream in which ever way you prefer :)

Enjoy,
Chika


Blog design by Bella Lulu Ink